
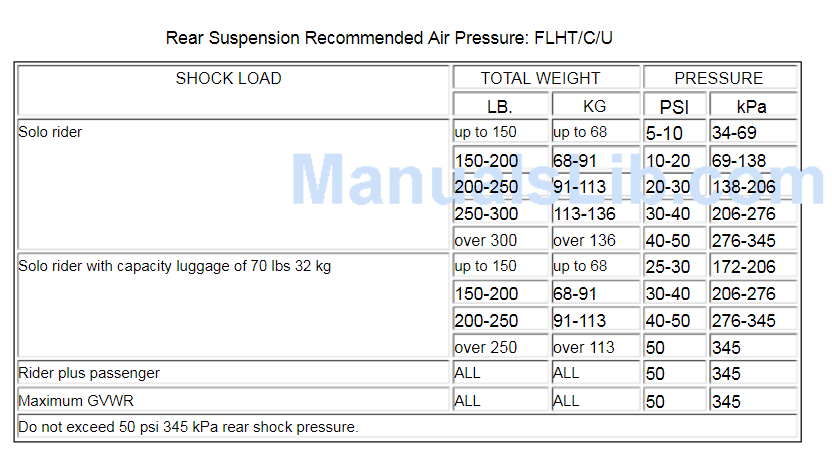
The Harley air shock pressure chart provides recommended air pressure settings for different rider weights and riding conditions. Properly adjusted air shocks ensure a smoother and more controlled ride.
Harley-Davidson motorcycles often feature air shocks to enhance ride comfort and handling. Adjusting the air pressure in these shocks is crucial for optimal performance. The pressure settings vary based on rider weight and the type of riding, such as solo or with a passenger.
Using the Harley air shock pressure chart, riders can easily find the right pressure settings. This leads to improved stability, better handling, and a more enjoyable ride. Regularly checking and adjusting the air shocks is a simple yet effective way to maintain your Harley’s performance.
Credit: www.hdforums.com
Introduction To Harley Air Shock Pressure
Understanding Harley air shock pressure is crucial for a smooth ride. The right pressure ensures comfort and stability. It also prolongs the life of your bike’s suspension system. Proper air shock pressure can make a huge difference in your riding experience.
The Role Of Air Shock Pressure In Your Ride
The air shock pressure helps your bike handle different terrains. It adjusts to the weight of the rider and any cargo. With the correct pressure, your bike absorbs shocks better. This makes for a more comfortable and safer ride.
Too little pressure can cause the bike to sag. This affects its handling and safety. Too much pressure can make the ride harsh and uncomfortable. Finding the right balance is key.
Benefits Of Optimizing Shock Pressure
Optimizing the shock pressure improves your bike’s performance. It ensures smoother rides on rough terrains. Proper pressure enhances handling, making the bike more responsive.
Here are some benefits of optimized shock pressure:
- Increased comfort
- Better handling
- Longer suspension life
- Improved safety
Below is a table showing the recommended air shock pressure for different weights:
| Rider Weight (lbs) | Air Shock Pressure (psi) |
|---|---|
| 100-150 | 20-30 |
| 150-200 | 30-40 |
| 200-250 | 40-50 |
| 250-300 | 50-60 |
Maintaining the right pressure is crucial. Always check the pressure before a ride. Adjust it according to the load and terrain. This ensures a safe and comfortable journey.
Decoding The Harley Air Shock Pressure Chart
Understanding the Harley Air Shock Pressure Chart is vital for a smooth ride. This guide will help you decode the chart easily.
Key Elements Of The Pressure Chart
The pressure chart includes essential elements for adjusting air shocks:
- Weight Range: Indicates the rider’s weight and passenger’s weight.
- Pressure Range: Shows the recommended air pressure in PSI (pounds per square inch).
- Shock Type: Differentiates between front and rear shocks.
Reading The Chart: A Step-by-step Guide
Follow these steps to read the Harley Air Shock Pressure Chart correctly:
- Identify Your Weight: Find your weight range on the chart.
- Check Passenger Weight: Add your passenger’s weight.
- Locate Pressure: Look at the corresponding pressure range.
- Adjust Shocks: Use the recommended PSI for your shocks.
Below is a sample table for clarity:
| Weight Range (lbs) | Front Shock PSI | Rear Shock PSI |
|---|---|---|
| 100-150 | 20-30 | 10-20 |
| 151-200 | 30-40 | 20-30 |
| 201-250 | 40-50 | 30-40 |
This chart helps you match your weight and pressure. Adjust your shocks to the recommended PSI for comfort and safety.
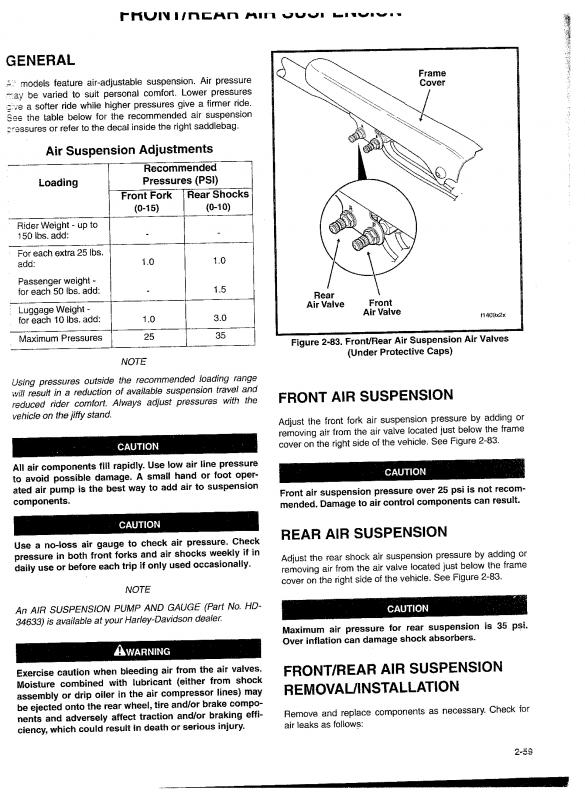
Adjusting Your Harley’s Air Shocks
Adjusting your Harley’s air shocks is crucial for a smooth ride. Proper adjustment ensures comfort and handling. Follow this guide to adjust your Harley’s air shocks. Let’s explore the tools and steps needed.
Tools Needed For Adjustment
Before you start, gather the necessary tools:
- Air pump with a gauge
- Pressure gauge
- Owner’s manual
- Rag or cloth for cleaning
Step-by-step Adjustment Process
Follow these steps for adjusting your Harley’s air shocks:
- Park your bike on a flat surface and ensure it’s stable.
- Locate the air valve on the shock absorber.
- Use the rag to clean the valve area.
- Connect the air pump to the valve.
- Check the current pressure with the gauge.
- Refer to the Harley Air Shock Pressure Chart in your manual.
- Adjust the air pressure to the recommended level.
- Disconnect the pump and recheck the pressure.
- Repeat if necessary until the desired pressure is achieved.
- Test ride your bike to ensure comfort and handling.
Refer to the table below for a quick glance at recommended pressures:
| Rider Weight (lbs) | Recommended Pressure (psi) |
|---|---|
| 150-200 | 20-30 |
| 200-250 | 30-40 |
| 250-300 | 40-50 |
Proper adjustment improves your riding experience. Take the time to adjust your shocks correctly.
Personalizing Your Ride: Factors Affecting Air Pressure
Personalizing your Harley ride involves adjusting the air shock pressure. Various factors affect the optimal pressure setting for your motorcycle. Understanding these factors ensures a smoother, safer, and more comfortable ride.
Rider Weight And Pressure Considerations
Rider weight is a primary factor in determining air shock pressure. Heavier riders need more pressure for stability. Lighter riders require less pressure for comfort. Below is a table that shows suggested air pressures based on rider weight:
| Rider Weight (lbs) | Recommended Air Pressure (PSI) |
|---|---|
| 100-150 | 10-20 |
| 150-200 | 20-30 |
| 200-250 | 30-40 |
| 250-300 | 40-50 |
These values are general guidelines. Always refer to your owner’s manual for precise recommendations.
Impact Of Luggage And Passenger Load
Carrying luggage and passengers affects air shock pressure needs. More load requires higher pressure. Less load needs lower pressure. Consider the following:
- Solo Ride: Lower pressure improves comfort.
- With Passenger: Increase pressure for stability.
- With Luggage: Additional pressure supports extra weight.
Adjust the pressure in small increments. Test ride to find the perfect balance. Overinflating or underinflating can affect ride quality and safety.
Use a reliable air pump with a gauge. Check pressure regularly. Proper maintenance ensures a smooth and enjoyable ride.
Troubleshooting Common Air Shock Issues
Harley air shocks are crucial for a smooth ride. Incorrect pressure can cause problems. Learn how to identify and fix these issues.
Identifying Symptoms Of Incorrect Pressure
Incorrect air shock pressure causes various symptoms. Low pressure can lead to a bumpy ride. High pressure might make the ride stiff and uncomfortable. Listen for strange noises, such as clicking or clunking. These noises often indicate incorrect pressure levels.
- Bumpy ride – Indicates low pressure.
- Stiff ride – Suggests high pressure.
- Noises – Clicking or clunking sounds.
Quick Fixes For Air Shock Problems
Fixing air shock issues quickly can save time and money. First, use a pressure gauge to check the current pressure. Adjust the air pressure to the recommended levels:
| Weight | Pressure (psi) |
|---|---|
| 150 lbs | 20-25 |
| 200 lbs | 30-35 |
| 250 lbs | 40-45 |
Check for air leaks. Spray soapy water on the shocks. Look for bubbles to identify leaks. Tighten any loose fittings to stop leaks.
- Use a pressure gauge.
- Adjust to recommended pressure.
- Check for air leaks.
- Tighten loose fittings.
Regular maintenance prevents many problems. Inspect air shocks every month. Adjust as needed for a smooth ride.
Maintenance Tips For Optimal Air Shock Performance
Maintaining your Harley’s air shocks is key for a smooth ride. Proper care ensures longevity and performance. Follow these tips to keep your air shocks in top condition.
Routine Check-ups For Air Shocks
- Check Air Pressure: Use a pressure gauge weekly.
- Inspect for Leaks: Look for oil or air leaks monthly.
- Clean the Shocks: Wipe them clean with a damp cloth.
- Check Fittings: Ensure all fittings are tight and secure.
Long-term Care Strategies
- Replace Seals: Change seals every 12 months.
- Lubricate Components: Use quality lubricants to avoid friction.
- Use a Pressure Chart: Refer to the Harley Air Shock Pressure Chart for accurate settings.
- Store Properly: Keep your bike in a dry place to prevent rust.
| Weight (lbs) | Recommended Pressure (psi) |
|---|---|
| 150-200 | 20-30 |
| 200-250 | 30-40 |
| 250-300 | 40-50 |
Regular maintenance of your Harley’s air shocks is crucial. Ensure optimal performance and a smoother ride by following these simple steps.
Upgrading Your Harley’s Air Shocks
Upgrading your Harley’s air shocks can improve your ride. The right air shocks provide better handling and comfort. They also enhance your bike’s performance.
When To Consider An Upgrade
You should consider an upgrade if your ride feels rough. Old shocks may not absorb bumps well. This can lead to a bumpy ride. Also, if your shocks are leaking air, it’s time to upgrade. Air leaks mean the shocks can’t maintain proper pressure.
- Rough Rides: If your ride feels too bumpy.
- Air Leaks: If your shocks can’t hold air.
- Poor Handling: If your bike wobbles or feels unstable.
Choosing The Right Air Shock Upgrades
Choosing the right air shock upgrades is crucial. First, check the Harley air shock pressure chart. This chart helps you understand the correct pressure for your bike. Next, decide on the type of air shocks. There are many types available.
Some popular brands include Progressive Suspension and Arnott. Look for shocks that offer adjustable pressure. This feature allows you to customize your ride. Also, consider the durability of the shocks. High-quality materials ensure long-lasting performance.
| Brand | Features | Durability |
|---|---|---|
| Progressive Suspension | Adjustable pressure, improved handling | High |
| Arnott | Customizable, enhanced comfort | High |
Before buying, read reviews from other Harley owners. Their experiences can guide you in choosing the best shocks. Always refer to the Harley air shock pressure chart for accurate information. Properly inflated shocks ensure a smooth and safe ride.
Credit: www.yumpu.com
Real Riders’ Experiences With Air Shock Pressure Adjustment
Adjusting air shock pressure can transform your Harley riding experience. Real riders share their stories, showcasing the impact of these adjustments.
Case Studies: Before And After Adjustment
Many Harley riders have found significant improvements after adjusting their air shock pressure. Let’s explore a few cases:
| Rider | Before Adjustment | After Adjustment |
|---|---|---|
| John | Bumpy ride, frequent bottoming out | Smoother ride, more comfortable |
| Sarah | High pressure, stiff suspension | Balanced pressure, better handling |
| Mike | Low pressure, less control | Optimal pressure, improved control |
Testimonials And Advice From Harley Enthusiasts
Harley enthusiasts offer valuable tips based on their experiences:
- John: “Adjusting my air shock pressure made my rides smoother.”
- Sarah: “I found the perfect balance for handling with medium pressure.”
- Mike: “Proper air shock pressure gave me better control.”
Here are some key pieces of advice:
- Check your Harley’s manual for recommended pressure ranges.
- Start with the middle range and test ride your Harley.
- Adjust the pressure in small increments for best results.
- Regularly check and maintain the air shock pressure.
These real-world experiences highlight the importance of air shock pressure adjustment. It ensures a better, more comfortable ride.
Conclusion: Enhancing Your Harley’s Performance
Understanding the Harley Air Shock Pressure Chart is crucial for optimizing your bike’s performance. The right air shock pressure can drastically improve your ride’s comfort and handling. Properly adjusted air shocks ensure smoother rides and better control, making your Harley experience more enjoyable.
Recap Of Key Takeaways
- Use the Harley Air Shock Pressure Chart to find the ideal pressure.
- Proper pressure enhances ride comfort and bike handling.
- Regularly check and adjust air shocks for optimal performance.
Final Thoughts On Air Shock Optimization
Optimizing air shocks based on the pressure chart boosts your Harley’s performance. Regular adjustments ensure you always have a smooth and controlled ride. Keep your Harley in top shape by following the pressure guidelines.
| Rider Weight | Recommended Pressure |
|---|---|
| Up to 150 lbs | 10-20 psi |
| 150-200 lbs | 20-30 psi |
| 200-250 lbs | 30-40 psi |
| 250+ lbs | 40-50 psi |
By following these guidelines, you ensure your Harley rides smoothly and handles well. Adjusting the air shock pressure is simple and can be done quickly. Always refer to the Harley Air Shock Pressure Chart for the best results.
Credit: www.hdforums.com
Conclusion
Finding the right Harley air shock pressure is essential for a smooth ride. Use the chart to ensure optimal performance. Regularly check and adjust the pressure for comfort and safety. Enjoy a better riding experience with the correct air shock settings.
Safe travels and happy riding!