Harley automatic primary chain tensioner problems often include premature wear and inconsistent tension. These issues can lead to chain slippage and potential engine damage.
Harley-Davidson motorcycles are renowned for their reliability and performance. However, the automatic primary chain tensioner has been a source of concern for many riders. This component is crucial for maintaining the correct tension in the primary chain, which connects the engine to the transmission.
Issues with this tensioner can result in uneven chain wear, rattling noises, and even catastrophic engine failure. Regular inspection and timely replacement of the tensioner can help mitigate these problems. Understanding the common issues associated with Harley’s automatic primary chain tensioner can save riders from unexpected breakdowns and costly repairs.
Introduction To Harley Automatic Primary Chain Tensioners
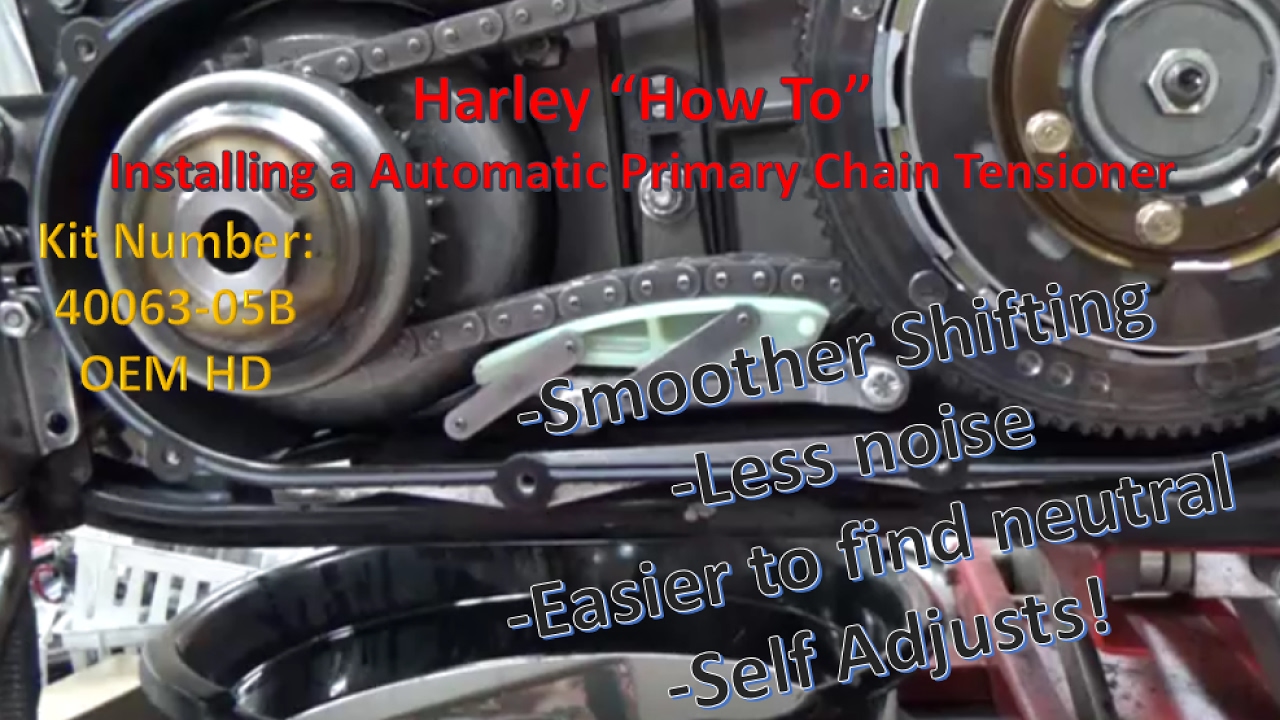
Harley-Davidson motorcycles are known for their reliability and performance. One key component is the automatic primary chain tensioner. This device helps keep the primary chain at the right tension. Proper tension ensures smooth power transfer from the engine to the gearbox.
The Role In Your Harley
The automatic primary chain tensioner plays a crucial role. It maintains the correct tension in the primary chain. This prevents chain slippage and excessive wear. It helps reduce the need for frequent manual adjustments. A well-functioning tensioner enhances your riding experience.
Common Issues Faced
Despite its importance, the automatic primary chain tensioner can face several issues. Here are some common problems:
- Over-tensioning: Can cause premature wear of the chain and sprockets.
- Under-tensioning: Leads to chain slippage and poor power transfer.
- Noise: A faulty tensioner can produce unusual noise.
- Failure to adjust: The tensioner may not adjust the chain properly.
Addressing these issues promptly is vital. Regular checks and maintenance can help avoid major problems. If you notice any unusual behavior, consult a professional mechanic. This will ensure your Harley continues to run smoothly.

Credit: www.hdforums.com
Symptoms Of A Faulty Tensioner
A faulty Harley Automatic Primary Chain Tensioner can lead to various problems. Recognizing the symptoms early can save time and money. Here are some key indicators.
Unusual Noises
One of the first signs is unusual noises. Listen for clunking or rattling sounds. These noises can mean the tensioner is not working well. Riders often describe the noise as a persistent metallic clatter. This sound usually comes from the primary case.
Another noise to watch for is a high-pitched squeal. This can happen when the chain is too tight. It’s important to address these noises quickly. They can lead to more serious problems if ignored.
Chain Performance Irregularities
A faulty tensioner can cause chain performance irregularities. One symptom is chain slippage. This happens when the chain is too loose. The chain may also seem to skip or jump.
Another sign is uneven chain wear. A poorly functioning tensioner can cause some parts of the chain to wear out faster. This can affect the overall performance of the bike. Riders may also notice a delay in acceleration. This delay can be a sign the chain is not moving smoothly.
Here is a simple table summarizing these symptoms:
| Symptom | Description |
|---|---|
| Unusual Noises | Clunking, rattling, or high-pitched squeal from primary case. |
| Chain Slippage | Chain slips, skips, or jumps. |
| Uneven Chain Wear | Parts of the chain wear out faster. |
| Delay in Acceleration | Chain does not move smoothly, causing delays. |
Pay attention to these symptoms to keep your Harley running smoothly. Regular checks can prevent bigger issues down the road.
Diagnosing Tensioner Issues
Diagnosing problems with your Harley’s automatic primary chain tensioner is crucial. It ensures your bike runs smoothly and prevents further damage. This guide will help you spot issues early, saving you time and money.
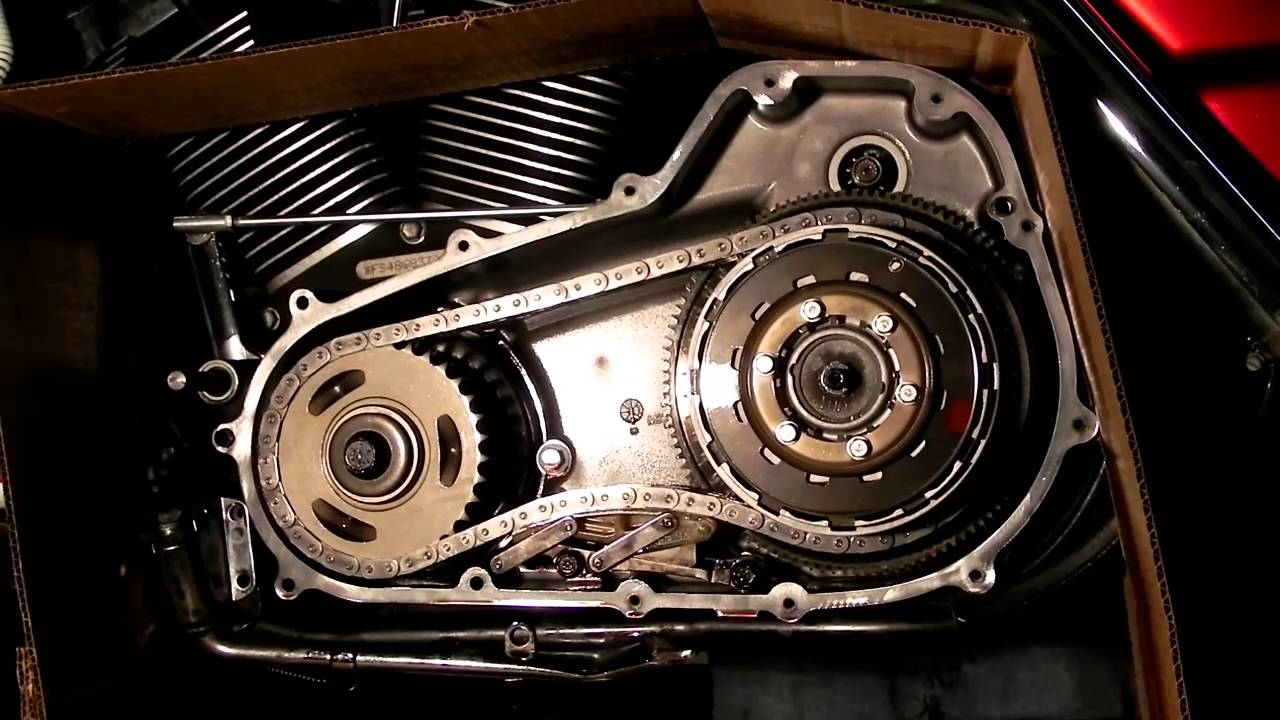
Visual Inspection
Start with a visual inspection of the tensioner. Look for wear or damage. Ensure the tensioner is clean and free of debris. Check the tensioner arm for cracks or bends. Examine the chain for signs of uneven wear.
To inspect more thoroughly, follow these steps:
- Remove the primary cover.
- Inspect the tensioner shoe for excessive wear.
- Look for oil leaks around the tensioner.
Use a flashlight to get a better view. Take notes of any visible issues.
Tension Measurement
Measuring the tension is the next step. Use a tension gauge for accurate results. Follow the manufacturer’s guidelines for proper tension levels.
Here’s a simple way to measure tension:
- Place the gauge on the chain.
- Check the reading against the recommended tension.
- Adjust if necessary.
A properly tensioned chain ensures smooth operation. It also prevents excessive wear on the tensioner.
| Model | Tension (inches) |
|---|---|
| Harley Sportster | 1/2 – 3/4 |
| Harley Dyna | 3/4 – 1 |
| Harley Softail | 1 – 1 1/4 |
If the tension is off, you might need to replace the tensioner. Regular checks can prevent major issues. Always refer to your owner’s manual for specific guidelines.
Immediate Fixes You Can Apply
The Harley automatic primary chain tensioner can sometimes cause issues. Immediate fixes help prevent damage and ensure smooth rides. Below, we cover some effective solutions.
Manual Adjustments
Manual adjustments can often resolve chain tensioner problems. Check the chain tension visually. If the chain looks too tight or too loose, it may need adjustment.
To adjust, first, loosen the locknut on the tensioner. Then, turn the adjuster screw. Turn clockwise to tighten the chain. Turn counterclockwise to loosen it. Once adjusted, tighten the locknut back in place.
Ensure you check the chain’s movement after adjusting. It should move freely without excessive slack. A chain with the right tension will run smoother and last longer.
Lubrication Techniques
Proper lubrication is essential for the chain tensioner. Use a high-quality chain lubricant. Apply the lubricant evenly on the chain.
Lubricate the chain every 500 miles or as needed. Always clean the chain before applying new lubricant. Dirt and grime can cause friction and wear.
Make sure to lubricate the tensioner itself. A well-lubricated tensioner works more efficiently. It also reduces the chances of malfunction.
| Step | Action |
|---|---|
| 1 | Clean the chain |
| 2 | Apply lubricant evenly |
| 3 | Check the tensioner |
Following these steps ensures optimal performance. Both manual adjustments and proper lubrication extend the lifespan of your chain and tensioner.
Replacing The Tensioner
Replacing the tensioner in your Harley can solve many issues. A faulty automatic primary chain tensioner can affect performance. Replacing it might seem hard but can be simple with the right steps.
When To Consider Replacement
Knowing when to replace the tensioner is crucial. Signs include unusual noise, chain slap, or oil leaks. If you notice any of these, it might be time to replace your tensioner.
Step-by-step Guide
- Gather Tools: You need a socket set, screwdrivers, and a torque wrench.
- Remove the Primary Cover: Use your tools to carefully remove the cover.
- Inspect the Tensioner: Check for wear and tear on the tensioner.
- Remove the Old Tensioner: Carefully unbolt and remove the old tensioner.
- Install the New Tensioner: Align and bolt the new tensioner in place.
- Reassemble the Primary Cover: Put the cover back on and bolt it securely.
- Test the Bike: Start the bike to ensure everything works correctly.
Replacing the tensioner can restore your bike’s performance. Follow these steps to ensure a smooth replacement process. Regular maintenance is key to a healthy bike.
Upgrading To A Better Tensioner
Upgrading your Harley’s automatic primary chain tensioner can solve many problems. A better tensioner ensures smoother rides and reduces wear and tear. It’s essential to know your options and make the right choice.
Options Available
There are several options when upgrading your Harley’s tensioner. Each has its benefits and drawbacks.
- Manual Tensioners: These require manual adjustments but offer more control.
- Hydraulic Tensioners: These adjust automatically using oil pressure.
- Spring-Loaded Tensioners: These use a spring mechanism for automatic adjustments.
| Type | Advantages | Disadvantages |
|---|---|---|
| Manual Tensioners | More control, precise adjustments | Needs frequent checks |
| Hydraulic Tensioners | Automatic, less maintenance | Can fail if oil pressure drops |
| Spring-Loaded Tensioners | Automatic, easy to install | Less precise than manual |
Making The Right Choice
Choosing the right tensioner depends on your riding style and needs. Consider the following factors:
- Riding Frequency: Frequent riders may prefer hydraulic tensioners.
- Maintenance Skills: Manual tensioners need more technical skills.
- Budget: Hydraulic tensioners can be more expensive.
A well-chosen tensioner can enhance your Harley’s performance. Ensure you pick the one that best suits your needs.
Maintenance Tips To Avoid Future Problems
Proper maintenance can prevent Harley automatic primary chain tensioner problems. Follow these tips to keep your bike running smoothly. Regular check-ups and proper chain care are essential.
Regular Check-ups
Regular inspections help spot early issues with the chain tensioner.
- Check the chain tension weekly.
- Inspect for unusual sounds or vibrations.
- Look for any visible wear and tear.
- Test the tensioner for proper function.
Maintaining a schedule for these checks ensures your bike stays in top shape. Keep a log of your inspections to track any changes over time.
Proper Chain Care
Proper chain care extends the life of your chain tensioner.
- Lubricate the chain regularly.
- Use the correct type of lubricant.
- Clean the chain to remove dirt and grime.
- Check the chain for proper alignment.
Lubrication reduces friction and wear. Clean chains run smoother and last longer. Always use a lubricant recommended by Harley.
Avoid over-tightening the chain. An overtight chain can cause excessive wear on the tensioner and other components. Use the manufacturer’s guidelines for proper tension settings.
| Maintenance Task | Frequency |
|---|---|
| Check Chain Tension | Weekly |
| Inspect for Wear and Tear | Weekly |
| Lubricate Chain | Every 500 miles |
| Clean Chain | Monthly |
Credit: m.youtube.com
Professional Help Vs. Diy
The Harley Automatic Primary Chain Tensioner can develop problems. Riders often face a choice: seek professional help or tackle the issue themselves. Both approaches have their advantages and challenges.
When To Seek A Mechanic
Sometimes, the problem may be too complex for DIY. If your Harley shows severe wear, a mechanic can help. Here are situations where professional help is best:
- Strange noises that don’t stop.
- Constant chain slippage.
- Visible damage to the tensioner.
Mechanics have the right tools and experience. They can quickly diagnose and fix issues. They also provide warranties for their work.
Resources For Diy Enthusiasts
Many riders prefer to fix their bikes themselves. For DIY enthusiasts, many resources are available. Here are some useful tools and guides:
- Manuals: The Harley service manual is a great start.
- Online Forums: Websites like Harley forums offer advice.
- Video Tutorials: YouTube has step-by-step guides.
| Tool | Purpose |
|---|---|
| Wrenches | Loosen and tighten bolts |
| Screwdrivers | Remove and attach screws |
| Tensioner Tool | Adjust chain tension |
Attempting a DIY repair can save money. It also gives a sense of accomplishment. Ensure you have the right tools and knowledge.

Credit: www.amazon.com
Conclusion
Addressing Harley automatic primary chain tensioner problems can enhance your bike’s performance. Regular maintenance is crucial. Identifying issues early prevents costly repairs. Always use quality parts and seek expert advice when needed. Proper care ensures a smoother, safer ride. Keep your Harley in top shape for the best riding experience.