Harley clutch cable length charts provide essential measurements for various Harley-Davidson models. Accurate cable lengths ensure smooth clutch operation and proper fitment.
Choosing the correct clutch cable length is vital for optimal motorcycle performance. Incorrect measurements can lead to poor clutch engagement and potential safety issues. The Harley clutch cable length chart helps riders find the right cable for their specific model and handlebar setup.
It simplifies the selection process by listing exact measurements for different Harley-Davidson motorcycles. Riders can avoid guesswork and ensure their bike’s clutch system operates efficiently. Utilizing the chart enhances riding comfort and safety, providing peace of mind. Always consult the chart before purchasing or replacing a clutch cable to guarantee a perfect fit.
Credit: www.legendmcs.com
Introduction To Harley Clutch Cable Systems
The clutch cable system in a Harley motorcycle is crucial. It connects the clutch lever to the clutch mechanism. This system ensures smooth gear shifts and optimal performance. Proper maintenance of the clutch cable is essential for longevity and safety.
Importance Of Correct Cable Length
Correct cable length is vital for your Harley’s performance. An incorrect length can cause significant issues:
- Poor gear shifts
- Increased wear and tear
- Potential safety hazards
Using the right length ensures smooth operation. It also prevents unnecessary strain on components.
Components Of The Clutch Cable
The clutch cable system consists of several important parts. Understanding these components helps in effective maintenance:
- Clutch Lever: The handle you pull to engage the clutch.
- Cable Housing: Protects the inner cable from damage.
- Inner Cable: The core wire that transmits the force.
- Cable Ends: Connects the cable to the clutch and lever.
A table can help visualize the parts and their functions:
| Component | Function |
|---|---|
| Clutch Lever | Engages the clutch system |
| Cable Housing | Protects the inner cable |
| Inner Cable | Transmits force |
| Cable Ends | Connects cable to clutch and lever |
Each part must be in good condition. Regular checks ensure your Harley runs smoothly.
Determining The Right Cable Length
Choosing the right Harley clutch cable length is vital for smooth rides. The correct length ensures optimal performance and safety. This section will guide you through the process of determining the right cable length.
Measuring Existing Cable
Start by measuring your existing clutch cable. Remove the cable from your bike. Lay it out straight and measure from end to end. Note this length down. This measurement is crucial for finding the right replacement or custom length.
Use a flexible tape measure for accuracy. Ensure no bends or kinks in the cable while measuring.
| Step | Description |
|---|---|
| 1 | Remove the cable from the bike |
| 2 | Lay it out straight |
| 3 | Measure from end to end |
| 4 | Note the length |
Calculating Length For Custom Setups
For custom setups, you may need a different length. Measure the distance between the clutch lever and the clutch actuator. Add some slack for smooth operation. Handlebar height changes might also affect the required length.
Follow these steps:
- Measure from the clutch lever to the clutch actuator.
- Account for handlebar height changes.
- Add extra length for slack.
- Use the final measurement to order a custom cable.
Remember, a cable too short can cause tension issues. A cable too long can cause excessive slack. Ensure the length is just right for optimal performance.
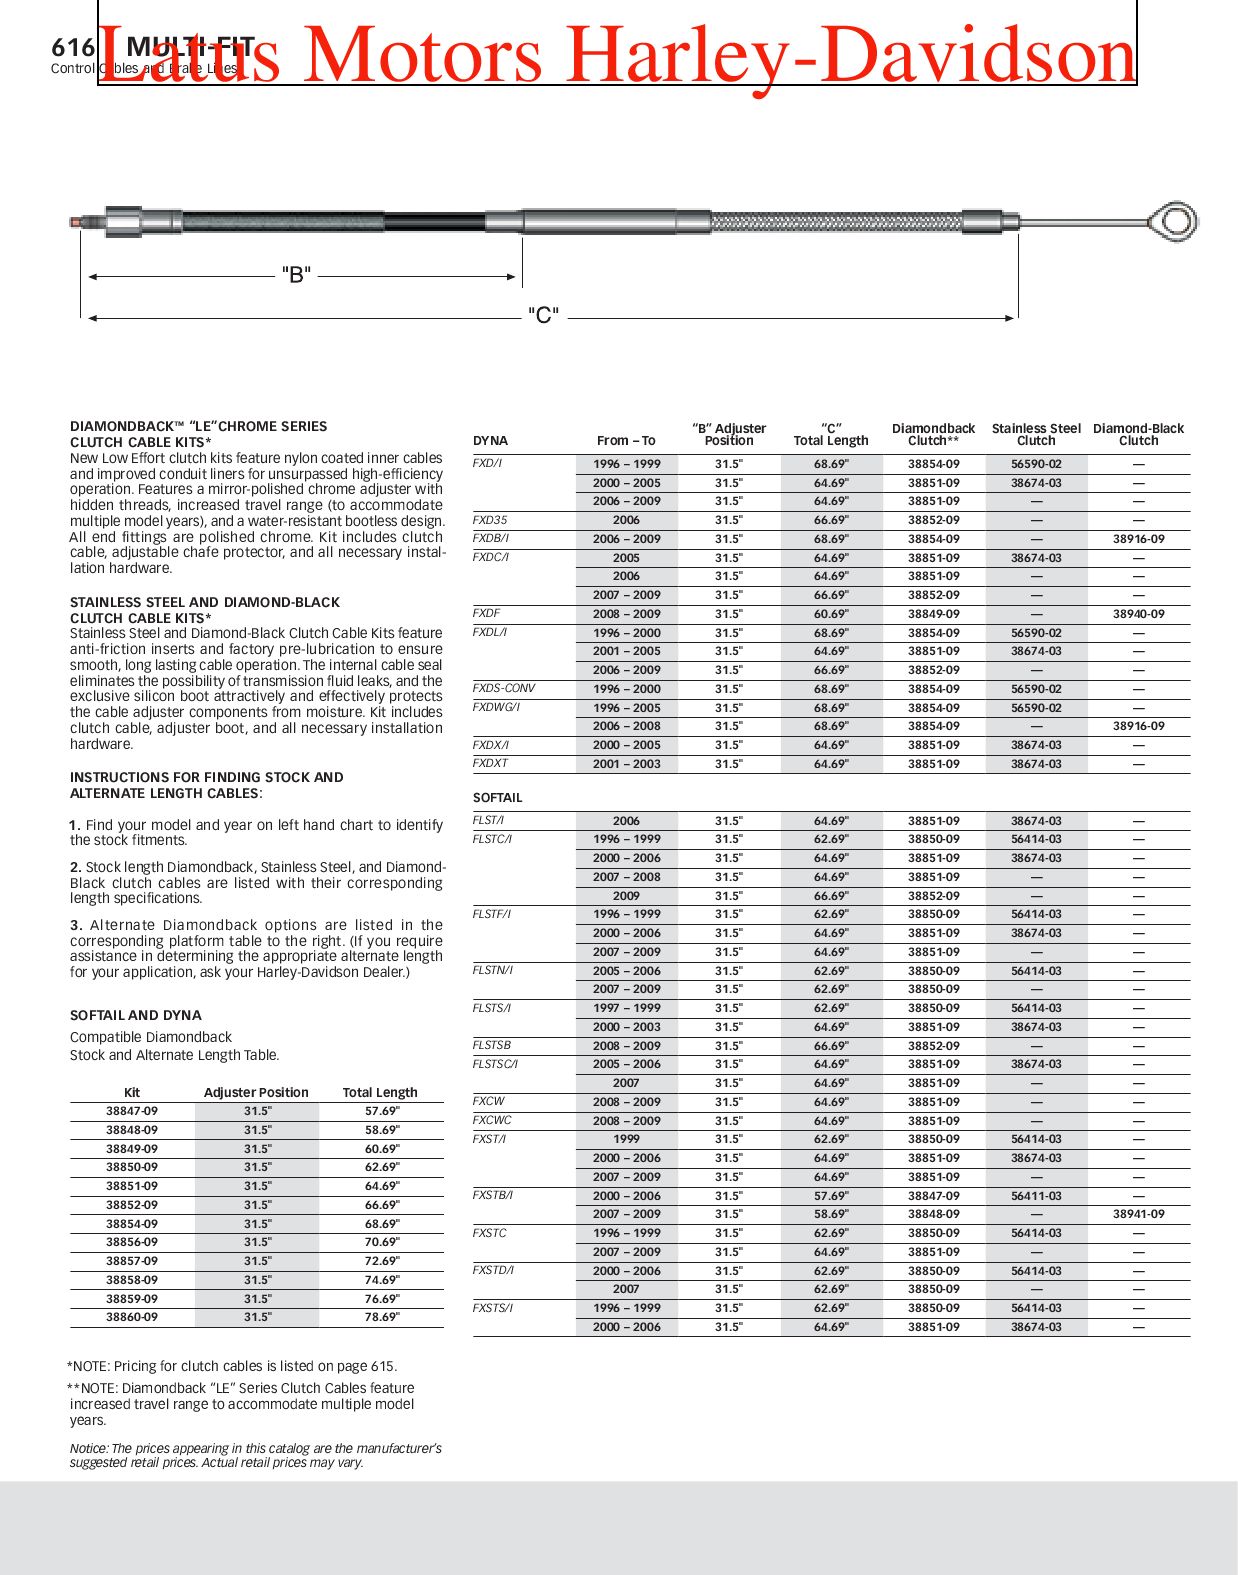
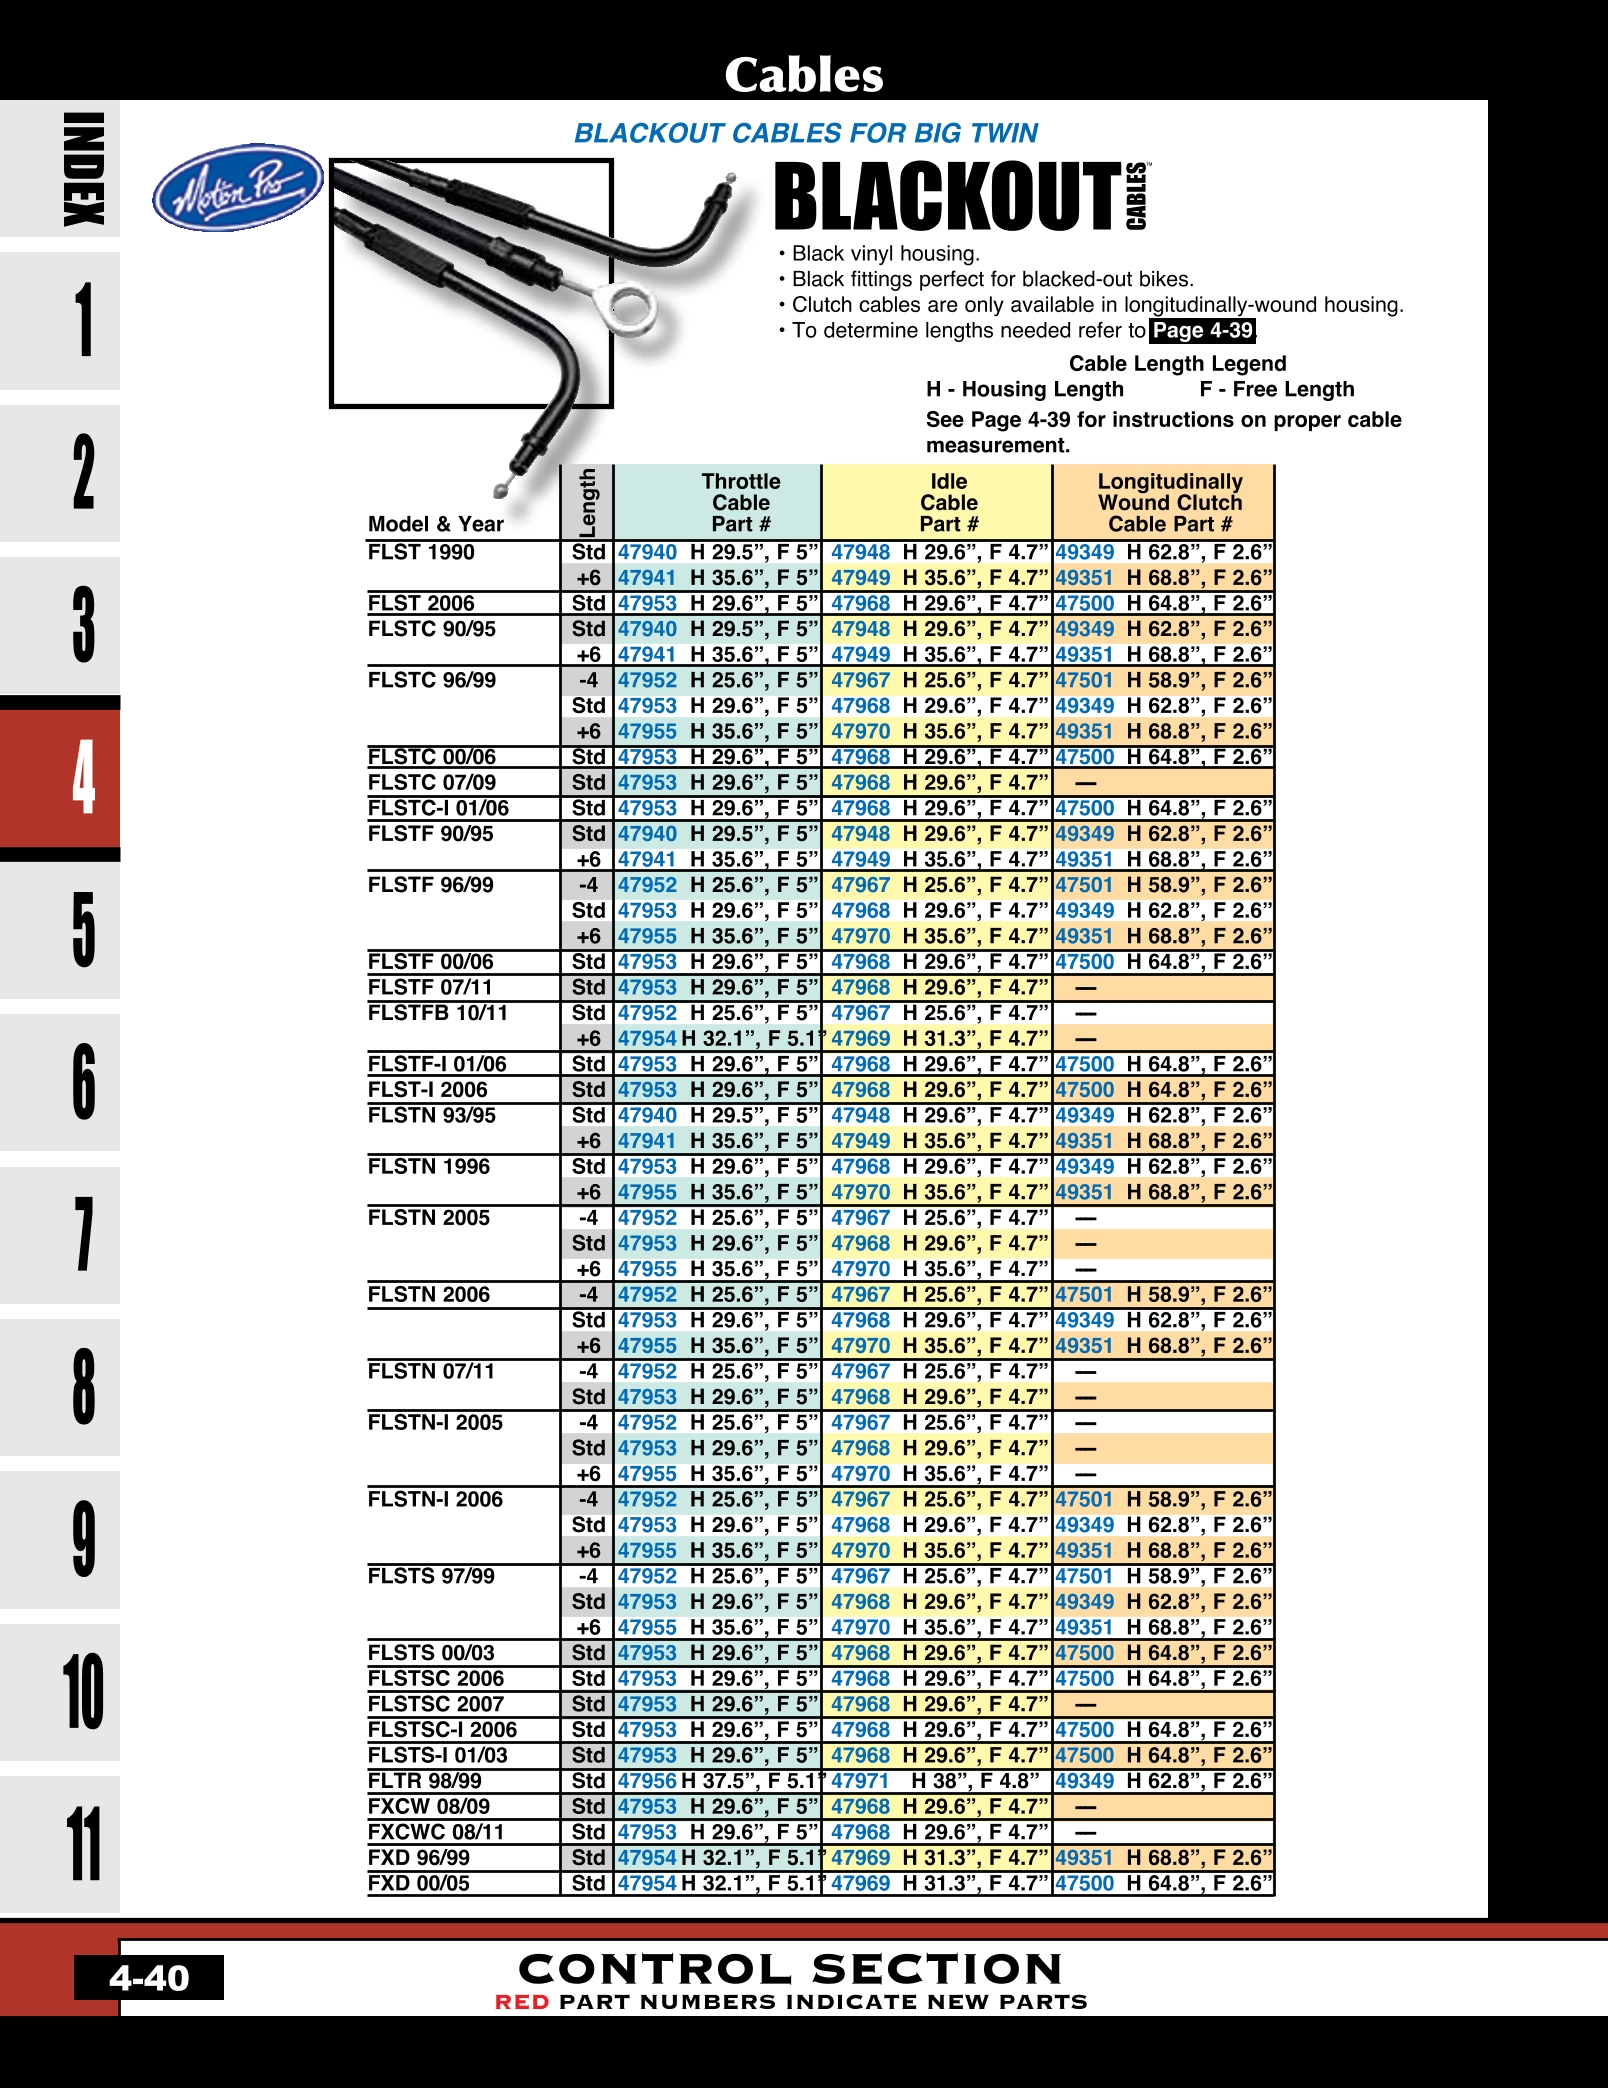
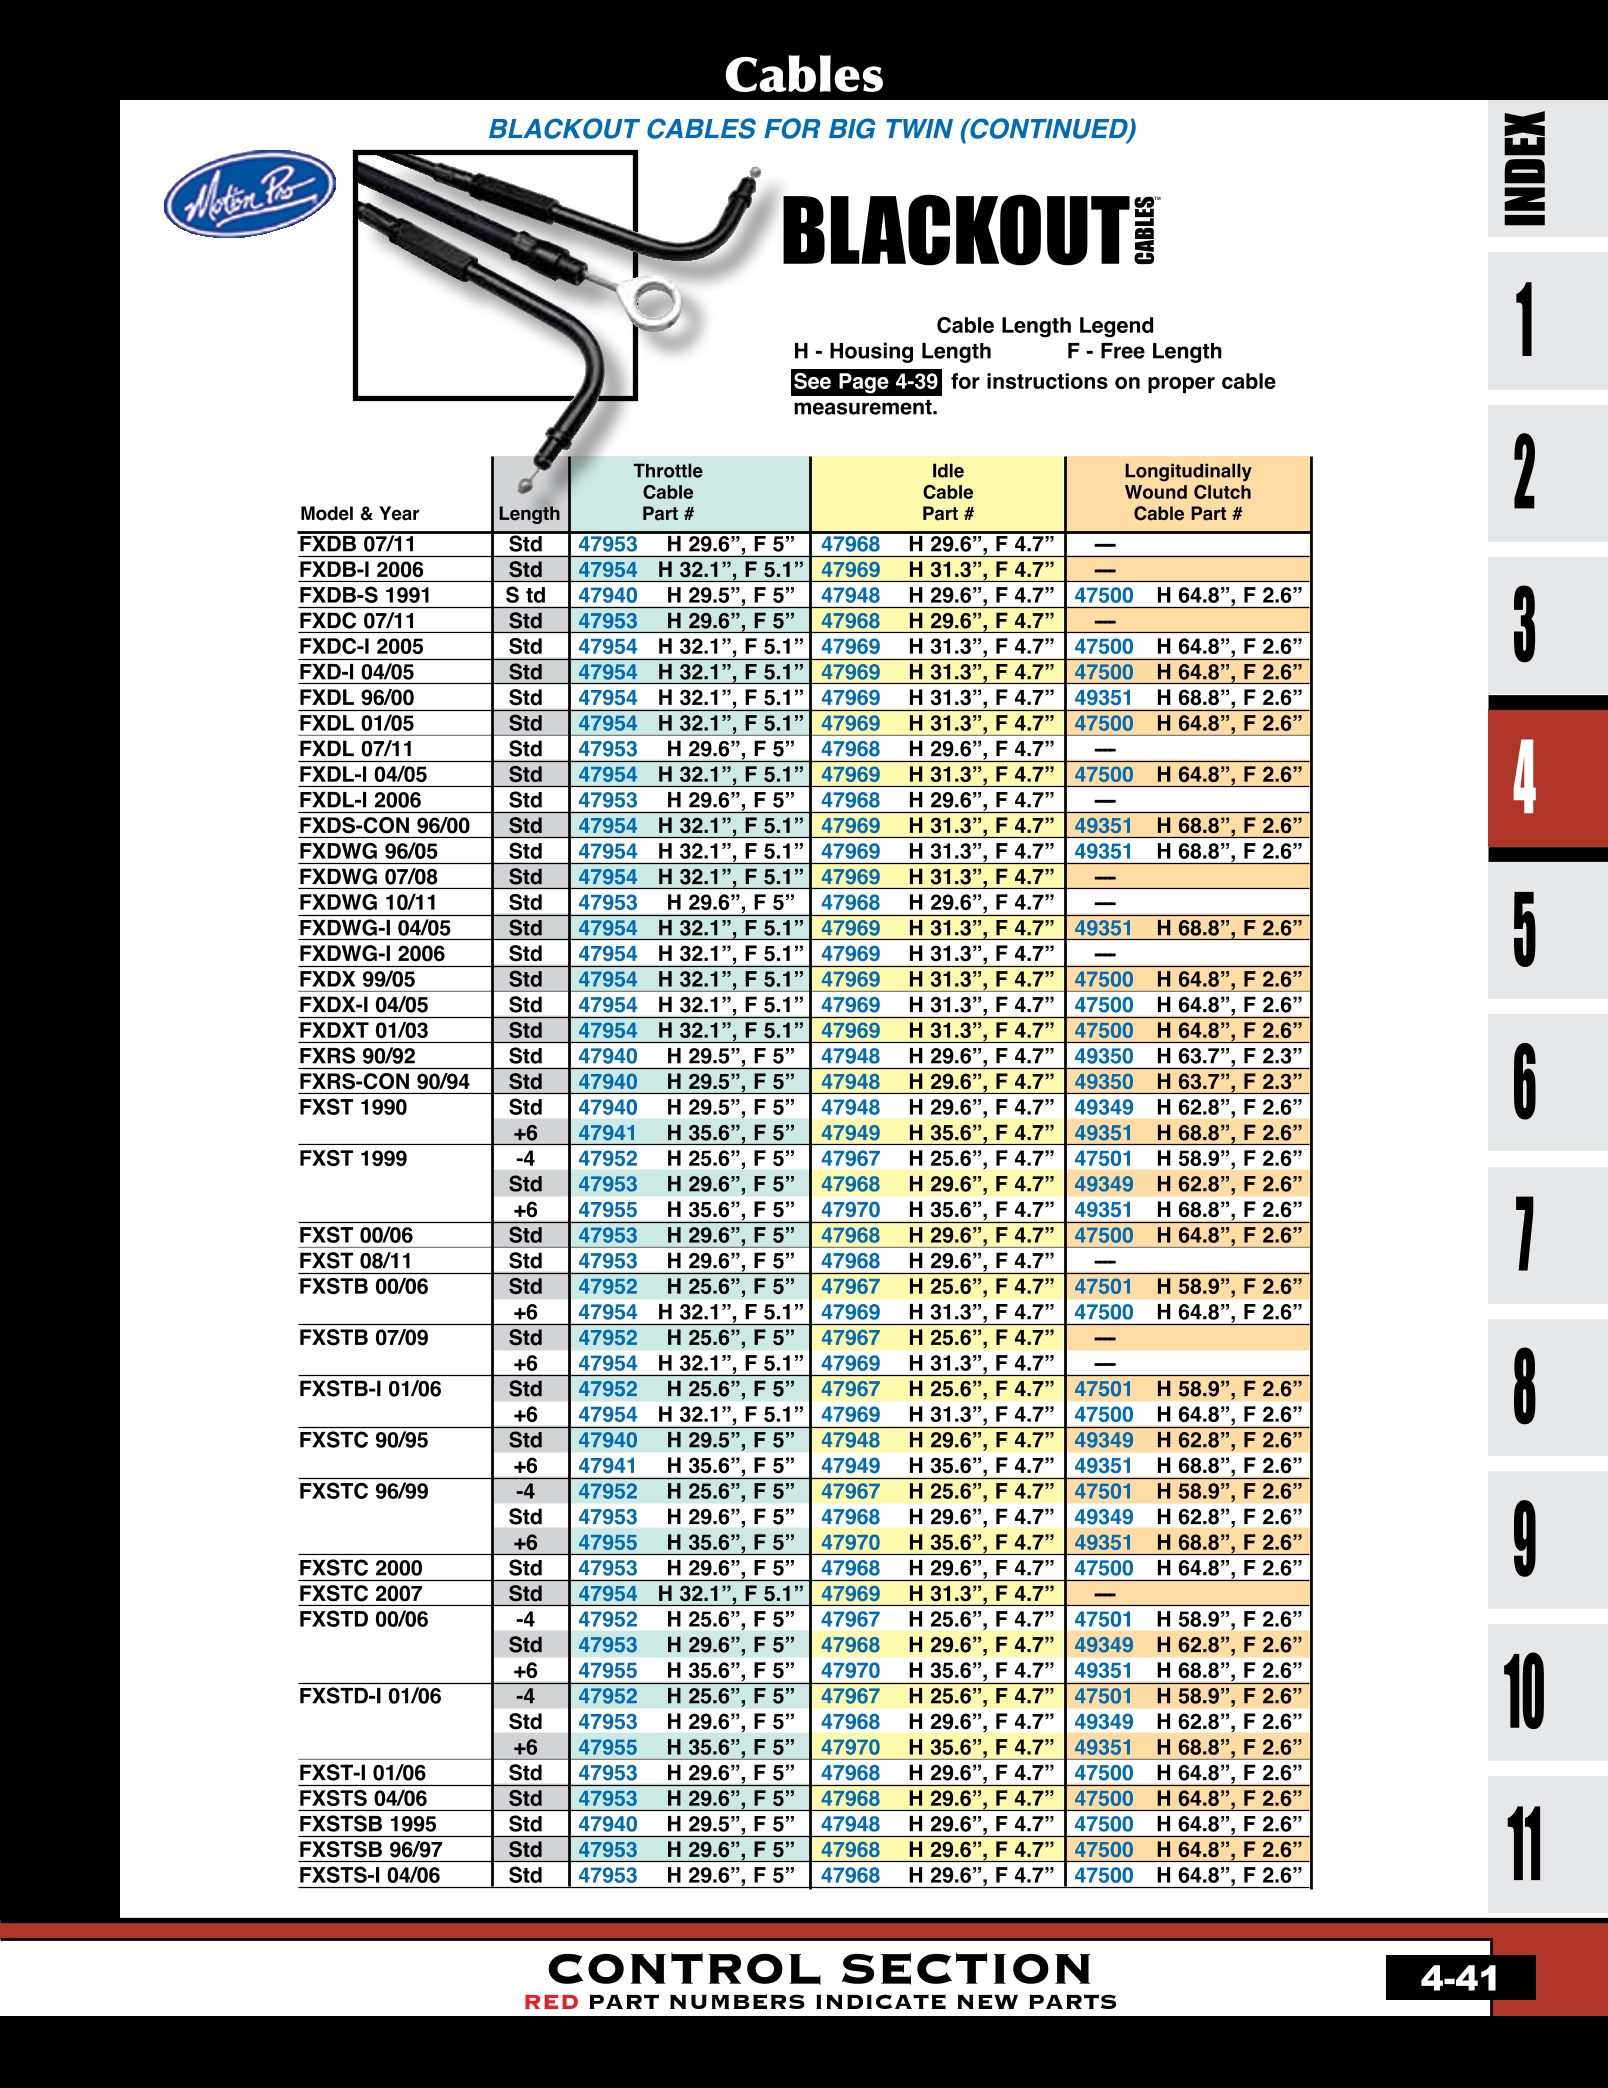
Harley Clutch Cable Length Chart
Choosing the right clutch cable for your Harley-Davidson is crucial. The correct cable length ensures smooth operation and performance. This post helps you understand the Harley Clutch Cable Length Chart. Find your bike’s perfect fit easily.
Reading The Chart
Understanding the Harley Clutch Cable Length Chart is simple. The chart lists cable lengths for different models. Use it to match your bike’s requirements.
- Locate your Harley model in the chart.
- Find the recommended cable length next to it.
- Check the part number if available.
Model-specific Cable Lengths
Each Harley-Davidson model may need a different cable length. The chart below shows common models and their recommended cable lengths.
| Harley Model | Recommended Cable Length (inches) | Part Number |
|---|---|---|
| Sportster XL | 57 | 38607-87 |
| Softail FXST | 61 | 38668-99 |
| Touring FLHT | 64 | 38667-98 |
Refer to this chart for other models. Ensure you get the right length for your motorcycle. Using an incorrect length can affect clutch performance.
Installation Tips For Clutch Cables
Installing a new clutch cable can enhance your Harley’s performance. Follow these tips to ensure a smooth installation process. Proper preparation and the right tools are essential for success.
Preparation And Tools Needed
Before starting, gather all necessary tools and materials. This ensures you won’t have to search for items midway.
- New clutch cable that matches your Harley model
- Wrenches of various sizes
- Screwdrivers
- Lubricant for smooth operation
- Clean rags to wipe excess grease
- Service manual for your specific Harley model
Prepare a clean workspace to avoid losing small parts. Make sure your bike is on a stable stand.
Step-by-step Installation Guide
Follow these steps for a seamless clutch cable installation.
- Remove the old cable: Loosen the cable adjuster and disconnect it from the clutch lever.
- Disconnect from transmission: Use a wrench to unscrew the cable from the transmission end.
- Remove all fasteners: Take out any clips or brackets holding the cable in place.
- Prepare the new cable: Lubricate the new cable for smooth operation.
- Attach to transmission: Secure the new cable to the transmission end first.
- Route the cable: Follow the same path as the old cable, securing it with clips or brackets.
- Connect to clutch lever: Attach the cable to the clutch lever and adjust the tension.
- Test the clutch: Pull the lever to ensure smooth operation and proper tension.
Use your service manual for specific instructions related to your Harley model. This ensures all components are correctly installed and adjusted.
Following these steps will help you install your new clutch cable efficiently. This will improve your Harley’s performance and riding experience.
Adjusting Your Clutch Cable
Properly adjusting your Harley clutch cable ensures smooth rides and optimal performance. An incorrectly adjusted clutch cable can lead to gear shifting issues and undue wear. Follow these steps for initial and routine adjustments.
Initial Adjustments Post-installation
After installing a new clutch cable, start by ensuring the cable is correctly routed. Check the Harley Clutch Cable Length Chart to confirm you have the right length.
Next, locate the clutch adjuster, typically found near the middle of the cable. Loosen the locknut and adjust the cable adjuster until there is a slight amount of free play at the lever. This prevents undue tension.
| Step | Description |
|---|---|
| 1 | Ensure correct cable routing |
| 2 | Locate the clutch adjuster |
| 3 | Loosen the locknut |
| 4 | Adjust for slight free play |
Routine Maintenance Adjustments
Regular adjustments help maintain the performance of your Harley. Routinely check the free play at the clutch lever. Too much or too little free play can affect the clutch’s performance.
Follow these steps for routine adjustments:
- Check the free play at the lever.
- Adjust the cable if necessary.
- Tighten the locknut securely.
- Test the clutch operation.
Maintaining the correct clutch cable tension ensures smoother rides and prolongs the life of your clutch system. Always refer to the Harley Clutch Cable Length Chart for accurate measurements.

Credit: issuu.com
Common Issues And Troubleshooting
Harley riders often face issues with their clutch cables. A common problem is using the incorrect cable length. It can cause several performance issues. This section will help you identify these issues. We’ll also provide solutions to fix them.
Symptoms Of Incorrect Cable Length
Using the wrong cable length can cause various symptoms. Here are the most common ones:
- Difficulty in Shifting Gears: If the cable is too short, shifting gears becomes hard.
- Loose Clutch Lever: A too-long cable can make the clutch lever feel loose.
- Clutch Slipping: Incorrect cable length can cause the clutch to slip.
- Stiff Clutch Lever: A short cable can make the lever stiff and hard to pull.
Solutions For Cable-related Problems
Now that you know the symptoms, let’s look at the solutions. Here are some steps to solve cable-related problems:
- Check Cable Length: Use a Harley clutch cable length chart. Ensure the cable matches your bike’s specifications.
- Adjust the Cable: Adjust the clutch cable tension. This can resolve minor issues.
- Replace the Cable: If adjustment doesn’t work, replace the cable. Use the correct length according to the chart.
- Lubricate the Cable: Sometimes, lubrication can solve the problem. Use a good-quality lubricant.
Here’s a simple table for quick reference:
| Issue | Solution |
|---|---|
| Difficulty in Shifting Gears | Check and adjust cable length |
| Loose Clutch Lever | Use a shorter cable |
| Clutch Slipping | Replace with correct length cable |
| Stiff Clutch Lever | Check for correct length and lubricate |
By following these steps, you can resolve most clutch cable issues. Ensure to use the correct cable length. It will enhance your riding experience.
Performance Considerations
Understanding the Harley clutch cable length chart is crucial for optimal performance. The right cable length ensures smooth clutch operation. It also enhances the overall riding experience. This section explores the impact of cable length on performance and available upgrades.
Impact Of Cable Length On Riding
The cable length affects how your Harley handles. A cable that’s too short can restrict movement. This makes it harder to operate the clutch. On the other hand, a cable that’s too long may cause delays in clutch response. These delays can affect your riding agility. Ensuring the right cable length is key for smooth riding.
Let’s break down the impact:
- Short Cable: Restricts handlebar movement, making it difficult to maneuver.
- Long Cable: Causes delayed clutch response, affecting riding precision.
- Optimal Length: Ensures smooth clutch operation and precise control.
Upgrades And Aftermarket Options
Many riders opt for upgrades and aftermarket options. These upgrades can improve performance and customize their Harley. Aftermarket cables often offer better durability and flexibility. They come in various lengths to suit different handlebars and riding styles.
Consider these options:
- Stainless Steel Cables: Offer increased durability and smoother operation.
- Performance Cables: Designed for high-torque applications and aggressive riding.
- Custom Length Cables: Tailored to fit unique handlebar setups.
Upgrading your clutch cable can enhance your Harley’s performance. It provides a more enjoyable riding experience.
Credit: www.legendmcs.com
Maintenance And Care For Longevity
Maintaining your Harley clutch cable is crucial for smooth rides. Proper care ensures your cable lasts longer and performs well. Here, we discuss the best practices for clutch cable maintenance.
Regular Inspection And Cleaning
Regular inspection keeps your clutch cable in top shape. Check the cable for wear and tear. Look for fraying, rust, or kinks. A quick inspection can prevent bigger issues.
Clean the cable often to remove dirt and grime. Use a soft cloth and mild cleaner. Avoid harsh chemicals that can damage the cable. Cleaning helps the cable move smoothly.
| Inspection Task | Frequency |
|---|---|
| Check for Fraying | Monthly |
| Check for Rust | Monthly |
| Clean the Cable | Bi-weekly |
When To Replace Your Clutch Cable
Knowing when to replace the clutch cable is important. A worn-out cable can affect bike performance.
- Replace if the cable shows visible fraying.
- Replace if the cable has rust or corrosion.
- Replace if the cable feels stiff or sticky.
Regular checks can help you spot these signs early. Replace the cable before it breaks to avoid sudden failure.
- Inspect the cable monthly.
- Clean the cable bi-weekly.
- Replace the cable if it shows signs of damage.
By following these tips, you can keep your Harley clutch cable in great condition.
Faqs And Expert Advice
Understanding the Harley Clutch Cable Length Chart can be challenging. This section answers common questions and provides expert tips.
Top Questions From Riders
| Question | Answer |
|---|---|
| How do I measure my clutch cable? | Use a tape measure from end to end of the cable. |
| What if my cable is too short? | Replace it with a longer cable for better performance. |
| Can I use a generic cable? | It’s best to use a cable designed for your Harley model. |
Expert Tips For Optimal Performance
- Choose the right length: Always measure your existing cable accurately.
- Quality matters: Use high-quality cables for durability.
- Regular checks: Inspect cables regularly for wear and tear.
For a smooth ride, proper cable length is crucial. Follow these tips to ensure your Harley performs at its best.
Conclusion
Choosing the right clutch cable length is crucial for your Harley’s performance. Our chart makes it simple to find the perfect fit. Enjoy smoother rides and better control by selecting the correct cable. Don’t overlook this essential detail for your motorcycle’s maintenance and overall riding experience.