The Harley Davidson Bulb Replacement Chart provides specific details on compatible bulbs for different Harley Davidson models. It ensures proper lighting performance and safety.
Harley Davidson motorcycles are renowned for their style and performance. Ensuring your bike’s lights function correctly is crucial for safety and visibility. The Bulb Replacement Chart is a valuable resource for Harley owners. It lists the exact bulb specifications for various models, making it easy to find the right replacement.
Whether you need a headlight, tail light, or indicator bulb, the chart simplifies the process. Regularly checking and replacing your bulbs ensures optimal performance and safety. Riders can confidently maintain their motorcycles with the help of this comprehensive guide.
Introduction To Harley Davidson Maintenance
Maintaining a Harley Davidson is crucial for a smooth ride. Proper maintenance ensures safety and longevity. One key aspect is the lighting system. Knowing your bike’s bulb requirements helps keep it roadworthy.
The Importance Of Proper Lighting
Proper lighting is essential for visibility and safety. It helps riders see the road clearly at night. It also makes the bike visible to other drivers. Faulty lights can lead to accidents. Regular checks and replacements are necessary.
Understanding Your Harley’s Bulb Requirements
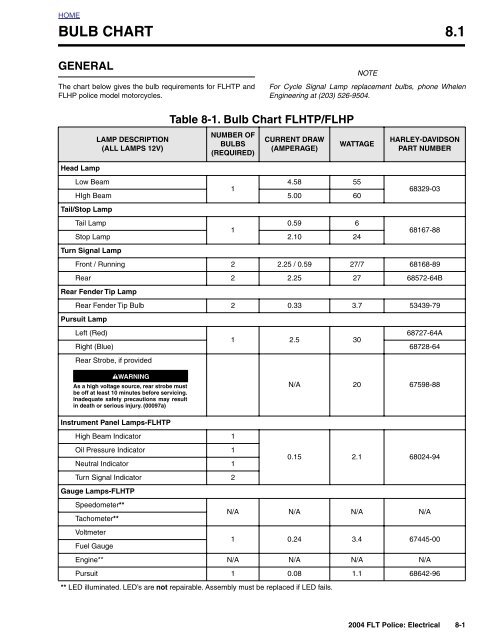
Different Harley models have specific bulb needs. Knowing the right type of bulb is important. This ensures compatibility and performance. Below is a table showing common Harley Davidson bulbs:
| Model | Headlight Bulb | Tail Light Bulb | Turn Signal Bulb |
|---|---|---|---|
| Sportster | H4 | 1157 | 1156 |
| Softail | H4 | 1157 | 1156 |
| Touring | H4 | 1157 | 1156 |
Refer to your owner’s manual for exact specifications. Using the correct bulbs ensures optimal performance. Regularly inspect all lights for any issues. Replace bulbs as needed to maintain safety and functionality.
Proper lighting is a vital part of your Harley’s maintenance. Understanding bulb requirements helps keep your bike in top condition. Always use the recommended bulbs for your model.
Credit: www.visionxusa.com
Identifying Your Model And Year
Knowing your Harley Davidson’s model and year is vital for a bulb replacement. Each model may use different bulbs. This guide helps you locate the right information.
Locating The Model Information
Your Harley Davidson’s model information is usually found on the VIN plate. This plate is often located on the steering head. It has a 17-character code. This code tells you the model and year.
You can also find the model information in your bike’s owner’s manual. The manual includes detailed information about the motorcycle. It lists the specific model number.
If you still can’t find it, check the registration documents. These papers often contain the model number and year. Make sure to keep these documents handy.
Why Year Of Manufacture Matters
The year of manufacture is crucial for bulb replacement. Different years may have different bulb types. A 2010 model might use different bulbs than a 2015 model.
Manufacturers update the electrical systems and lighting components. These updates can change the type of bulbs used. Always match the bulb to the correct year.
Incorrect bulbs can lead to electrical issues. They may not fit properly or could burn out faster. Using the right bulb ensures your Harley runs smoothly.
Common Bulb Types By Year And Model
| Year | Model | Bulb Type |
|---|---|---|
| 2010 | Sportster | H4 |
| 2015 | Softail | 9003 |
| 2020 | Touring | H7 |
Using this bulb replacement chart helps you find the correct bulbs quickly. Always double-check the year and model before purchasing bulbs.
Types Of Bulbs Used In Harley Davidson Motorcycles
Harley Davidson motorcycles use different types of bulbs. Each type serves a specific purpose. Knowing the types of bulbs helps in maintaining your bike. This guide covers the main types of bulbs you will find.
Halogen Vs. Led
Halogen bulbs are traditional and common in many motorcycles. They are affordable and easy to replace. Halogen bulbs produce a warm, yellow light. They consume more power and generate more heat.
LED bulbs are modern and more efficient. They consume less power and last longer. LED bulbs produce a bright, white light. They are more expensive but worth the investment. LEDs are also cooler and safer for your bike.
Specialty Bulbs For Enhanced Performance
Harley Davidson offers specialty bulbs for better performance. These bulbs provide enhanced visibility and safety. There are several types of specialty bulbs available.
- High-Intensity Discharge (HID) bulbs: Provide intense light and better visibility.
- Fog lights: Help in low visibility conditions.
- Custom LED arrays: Offer unique lighting patterns and colors.
Understanding these bulbs helps in choosing the right one. Keep your Harley Davidson safe and well-lit on the road.
Reading The Bulb Replacement Chart
Navigating the Harley Davidson Bulb Replacement Chart can seem daunting at first. This chart is essential for keeping your bike’s lights in top shape. Proper lighting ensures safety and enhances your bike’s look. Let’s break it down into simpler parts.
Interpreting Chart Symbols And Codes
The chart uses various symbols and codes. Each symbol represents a specific type of bulb. Codes indicate the bulb’s specifications. Understanding these is crucial for selecting the right bulbs.
- H4 – Headlight Bulb
- 1157 – Tail/Brake Light
- T10 – Indicator Bulb
The symbols are often accompanied by a color code. This helps in quick identification. For instance, a yellow dot might indicate a high-beam headlight. A red dot could signify a tail light. Familiarize yourself with these codes to make your selection easier.
Matching Bulbs To Your Bike’s Specs
Ensure the bulb matches your bike’s specifications. Refer to your bike’s manual for this information. Each model has unique needs for bulb types and sizes.
| Bike Model | Headlight | Tail/Brake Light | Indicator |
|---|---|---|---|
| Street 750 | H4 | 1157 | T10 |
| Iron 883 | H4 | 1157 | T10 |
| Fat Boy | H4 | 1157 | T10 |
Using the correct bulbs ensures optimal performance. It also extends the life of your lighting system. Incorrect bulbs can cause damage or reduce visibility.
Always double-check the replacement chart and your bike’s manual. This ensures a perfect match every time.
Step-by-step Guide To Bulb Replacement
Replacing the bulbs on your Harley Davidson is easy. This guide will help you do it step-by-step. You will need the right tools and safety measures.
Tools And Preparations
Before you start, gather all the necessary tools. Here is a list of items you will need:
- New Bulbs: Check the Harley Davidson bulb replacement chart for the correct type.
- Screwdrivers: Both Phillips and flathead types.
- Socket Wrench Set: For loosening and tightening bolts.
- Gloves: To protect your hands.
- Microfiber Cloth: For cleaning the bulb housing.
Ensure you have a clean workspace. This will help you avoid losing small parts.
Safety Measures And Precautions
Safety is very important. Follow these precautions:
- Turn Off the Engine: Make sure your Harley is off and cool.
- Disconnect the Battery: This prevents any electrical shocks.
- Wear Gloves: Protect your hands from heat and dirt.
- Use Proper Lighting: Ensure you can see clearly while working.
- Handle Bulbs Carefully: Avoid touching the glass part of the bulb.
Take your time and follow each step carefully. This ensures a safe and successful bulb replacement.
Troubleshooting Common Bulb Issues
Bulb issues on your Harley Davidson can be annoying. This guide will help you fix these problems. Follow the steps to keep your lights bright and safe.
Dealing With Dimming Lights
Dimming lights can be a sign of several issues. Check these common causes:
- Battery Issues: Ensure the battery is fully charged.
- Bulb Age: Old bulbs can dim over time. Replace if needed.
- Wiring Problems: Inspect for frayed or loose wires.
Here is a simple troubleshooting table:
| Problem | Possible Cause | Solution |
|---|---|---|
| Dimming Lights | Battery Low | Charge or Replace Battery |
| Dimming Lights | Old Bulb | Replace Bulb |
| Dimming Lights | Loose Wiring | Secure Connections |
Solving Flickering Bulb Problems
Flickering bulbs can be distracting. Here are steps to fix them:
- Check Connections: Ensure all wires are secure.
- Inspect the Bulb: Replace if it appears damaged.
- Examine the Socket: Clean or replace the socket.
Follow these steps to maintain a steady light:
- Secure any loose connections.
- Replace damaged bulbs.
- Clean the bulb socket.
Enhancing Visibility With Upgraded Bulbs
Upgrading the bulbs on your Harley Davidson can greatly enhance your riding experience. Better visibility ensures you see the road clearly and helps other drivers see you. This section will cover the benefits of upgrading your bulbs and recommend specific upgrades for different Harley Davidson models.
Benefits Of Upgrading
- Increased Brightness: New bulbs are brighter than old ones.
- Longer Lifespan: Upgraded bulbs last longer, saving you money.
- Energy Efficiency: Modern bulbs use less power, conserving your battery.
- Enhanced Safety: Improved visibility reduces the risk of accidents.
Recommended Bulb Upgrades For Different Models
| Model | Headlight Bulb | Taillight Bulb | Turn Signal Bulb |
|---|---|---|---|
| Sportster | H4 LED | 1157 LED | 1156 LED |
| Softail | H7 LED | 3157 LED | 1156 LED |
| Touring | H4 LED | 1157 LED | 3157 LED |
For the Sportster, the H4 LED headlight bulb offers a significant upgrade. It provides brighter, more focused light. The 1157 LED taillight bulb improves visibility from behind. The 1156 LED turn signal bulb ensures other drivers see your intentions.
For the Softail, the H7 LED headlight bulb is a perfect choice. It offers excellent brightness and durability. The 3157 LED taillight bulb lasts longer and shines brighter. The 1156 LED turn signal bulb offers consistent performance.
For the Touring models, the H4 LED headlight bulb is highly recommended. It provides superior illumination. The 1157 LED taillight bulb ensures you are seen from a distance. The 3157 LED turn signal bulb offers reliable signaling.
Maintenance Tips For Long-lasting Bulbs
Maintaining your Harley Davidson bulbs ensures a bright and safe ride. Proper care can extend their lifespan. Follow these tips to keep your bulbs shining longer.
Regular Check-ups
Regularly check your bulbs for signs of wear. Look for dimming or flickering lights. Replace bulbs that show these signs immediately.
- Inspect bulbs every month.
- Check for cracks or discoloration.
- Ensure bulbs are properly seated.
Cleaning And Care For Maximum Lifespan
Keep your bulbs clean to ensure maximum brightness. Dirt and grime can reduce light output.
- Turn off your motorcycle and let bulbs cool.
- Use a soft cloth to wipe the bulbs.
- Avoid touching bulbs with bare hands.
Handle bulbs with care to prevent damage. Clean contacts can also improve performance.
| Maintenance Task | Frequency |
|---|---|
| Check Bulbs | Monthly |
| Clean Bulbs | Every 3 Months |
| Replace Damaged Bulbs | As Needed |
Following these tips can help your Harley Davidson bulbs last longer.
Regulations And Legal Considerations
Replacing bulbs on your Harley Davidson is not just about fit and function. Legal requirements and regulations play a significant role. Ensuring your motorcycle is compliant can save you from fines and improve safety.
Understanding Local Laws
Different states have different laws about motorcycle lighting. It’s crucial to understand the specific lighting regulations in your area. Local laws may dictate the type, color, and positioning of the bulbs.
- Check your state’s Department of Motor Vehicles (DMV) website.
- Consult your local motorcycle club or group.
- Refer to your motorcycle’s owner manual for guidance.
Ensuring Compliance With Regulations
To ensure compliance, use only DOT-approved bulbs. DOT stands for Department of Transportation, and their approval ensures the bulb meets safety standards.
Here’s a simple checklist for ensuring compliance:
- Verify the bulb’s DOT certification.
- Check the color of the bulb; it should match legal standards.
- Ensure the bulb’s wattage is within the legal limit.
Below is a table summarizing the legal requirements for various bulb types:
| Bulb Type | Color Requirement | Wattage Limit |
|---|---|---|
| Headlight | White | 55W |
| Taillight | Red | 21W |
| Turn Signal | Amber | 21W |
Where To Buy Authentic Harley Davidson Bulbs
Finding authentic Harley Davidson bulbs is crucial for your bike’s performance. The right bulbs ensure safety and enhance your bike’s aesthetics. This section will help you find the best places to buy genuine Harley Davidson bulbs.
Trusted Retailers And Dealers
Buy from trusted retailers to ensure you get genuine products. Here are some reliable options:
- Authorized Harley Davidson Dealerships: Visit your nearest dealership for authentic parts.
- Official Harley Davidson Website: Purchase bulbs directly from the brand.
- Reputable Motorcycle Parts Stores: Stores like RevZilla and J&P Cycles offer genuine parts.
These options guarantee high-quality bulbs that fit perfectly.
Avoiding Counterfeit Products
Counterfeit products can harm your bike’s performance. Here’s how to avoid them:
- Check Packaging: Original bulbs come in branded packaging.
- Verify Serial Numbers: Match the serial number with the manufacturer’s database.
- Read Reviews: Look for customer feedback on the retailer’s site.
Follow these steps to ensure you get genuine Harley Davidson bulbs.
Conclusion: Enhancing Your Ride With The Right Bulbs
Choosing the right bulbs for your Harley Davidson is crucial. Proper lighting enhances safety and improves your riding experience. Let’s dive into the key points and final thoughts on maintaining and ensuring bulb safety.
Recap Of Key Points
- Importance of Proper Lighting: Ensures visibility and safety.
- Types of Bulbs: LED, Halogen, and Incandescent.
- Compatibility: Check your motorcycle’s manual for the right fit.
- Replacement Chart: Use a detailed chart for accurate replacements.
Final Thoughts On Bulb Maintenance And Safety
Regularly check your motorcycle’s bulbs. Replace them as needed to maintain optimal performance. Proper maintenance helps prevent accidents and ensures a smoother ride.
Keep a spare set of bulbs for emergencies. It’s always wise to be prepared for unexpected situations.
To summarize, using the right bulbs enhances your Harley Davidson’s performance. Follow the bulb replacement chart for precise and safe replacements.
| Bulb Type | Recommended Replacement Interval |
|---|---|
| LED | Every 3-5 years |
| Halogen | Every 2-3 years |
| Incandescent | Annually |

Credit: www.yumpu.com
Credit: www.hdforums.com
Conclusion
Finding the right bulb for your Harley Davidson is now easier with this comprehensive chart. Ensure optimal performance and safety by choosing the correct bulbs. Regular maintenance will keep your bike running smoothly. Refer to this guide whenever you need a quick bulb replacement.
Ride confidently, knowing you’re well-prepared.