Harley Davidson system relay problems often cause intermittent electrical issues and starting difficulties. Faulty relays can disrupt the bike’s performance.
Harley Davidson motorcycles are renowned for their reliability and performance. However, like any vehicle, they can experience mechanical issues. One common problem involves the system relays. These small components play a crucial role in the bike’s electrical system. A faulty relay can lead to a variety of issues, including starting problems and intermittent electrical failures.
Identifying and replacing a malfunctioning relay can resolve these problems. Riders should regularly check and maintain their relays to ensure optimal performance. Addressing these issues promptly can prevent more severe complications and keep the motorcycle running smoothly.
Introduction To Harley Relay Issues
Harley Davidson bikes are renowned for their performance. Yet, they can face relay issues. Understanding these problems is crucial for a smooth ride. Relays play a key role in your bike’s electrical system. Problems with relays can lead to many issues.
Common Symptoms Of Relay Failure
- Bike won’t start: This is a major sign of relay issues.
- Intermittent stalling: Your bike may stop randomly.
- Electrical failures: Lights and signals may not work.
- Clicking sound: A clicking noise can indicate a faulty relay.
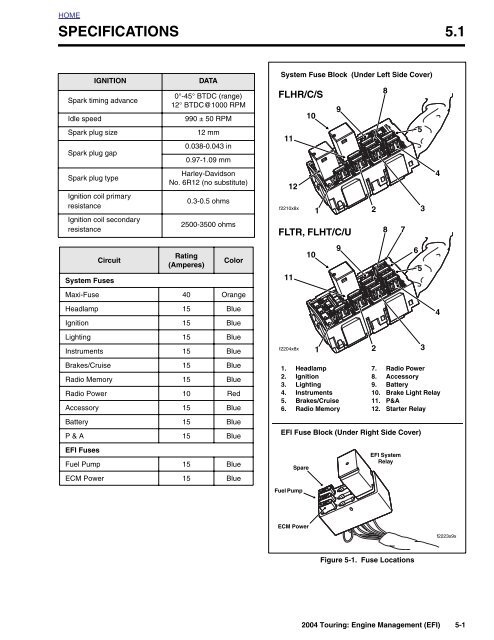
The Role Of The System Relay In Harley Davidson Bikes
The system relay acts like a switch in your bike. It controls the flow of electricity. Without a working relay, your bike’s electrical system fails. This includes the ignition, lights, and other components. Ensuring your relay works properly is vital.
Credit: www.hdforums.com
Identifying The Problem
Harley Davidson motorcycles are known for their reliability. Sometimes, though, system relay problems can occur. Knowing how to identify these issues is crucial. This section will guide you through the steps.
Steps To Diagnose A Faulty Relay
- Turn off the motorcycle: Ensure the bike is off and cool.
- Locate the relay: Check your manual for the relay’s location.
- Inspect the relay: Look for visible damage or corrosion.
- Listen for a click: Turn the key and listen for a clicking sound.
- Test with a multimeter: Measure the voltage to ensure it is correct.
Tools Needed For Relay Inspection
- Multimeter: Essential for measuring electrical values.
- Screwdrivers: Needed to open panels and access the relay.
- Gloves: Protect your hands while working.
- Flashlight: Helps you see in dark areas of the motorcycle.
- Relay Tester: Optional but useful for more accurate testing.
Quick Fix Strategies
Harley Davidson riders often face issues with the system relay. These problems can be frustrating. This section will cover quick fix strategies. It includes both temporary and long-term solutions. This way, you can enjoy your ride without hassle.
Temporary Solutions On The Road
Sometimes, you need a quick fix while on the road. Here are some temporary solutions:
- Check the relay connections: Ensure all wires are tight.
- Reset the relay: Turn the ignition off and on.
- Clean the relay contacts: Use a contact cleaner or a dry cloth.
- Swap relays: If you have a spare relay, replace the faulty one.
These steps can help you get back on the road quickly. They are easy and require minimal tools.
Long-term Fixes For Relay Issues
For a permanent solution, consider these long-term fixes:
- Replace the relay: Purchase a new, high-quality relay.
- Inspect the wiring: Look for any damaged wires and replace them.
- Upgrade the relay system: Install a more reliable relay system.
- Regular maintenance: Schedule regular checks for the relay system.
Taking these steps ensures your Harley Davidson runs smoothly. You can enjoy a trouble-free ride.
Credit: www.hdforums.com
Diy Relay Replacement
Experiencing relay problems with your Harley Davidson can be frustrating. A faulty relay can disrupt your bike’s performance. Fortunately, you can replace the relay yourself. Follow this guide to fix the issue and get back on the road.
Choosing The Right Replacement Relay
Choosing the right replacement relay is crucial. You need to ensure compatibility with your Harley Davidson model. Here are some tips:
- Check the part number on your existing relay.
- Consult the user manual for specifications.
- Visit the official Harley Davidson website for parts.
- Consider purchasing from reputable dealers.
| Model | Recommended Relay |
|---|---|
| Sportster | Relay Model X123 |
| Softail | Relay Model Y456 |
| Touring | Relay Model Z789 |
Step-by-step Guide To Replacing The Relay
Follow these steps to replace the relay on your Harley Davidson:
- Turn off the engine and disconnect the battery.
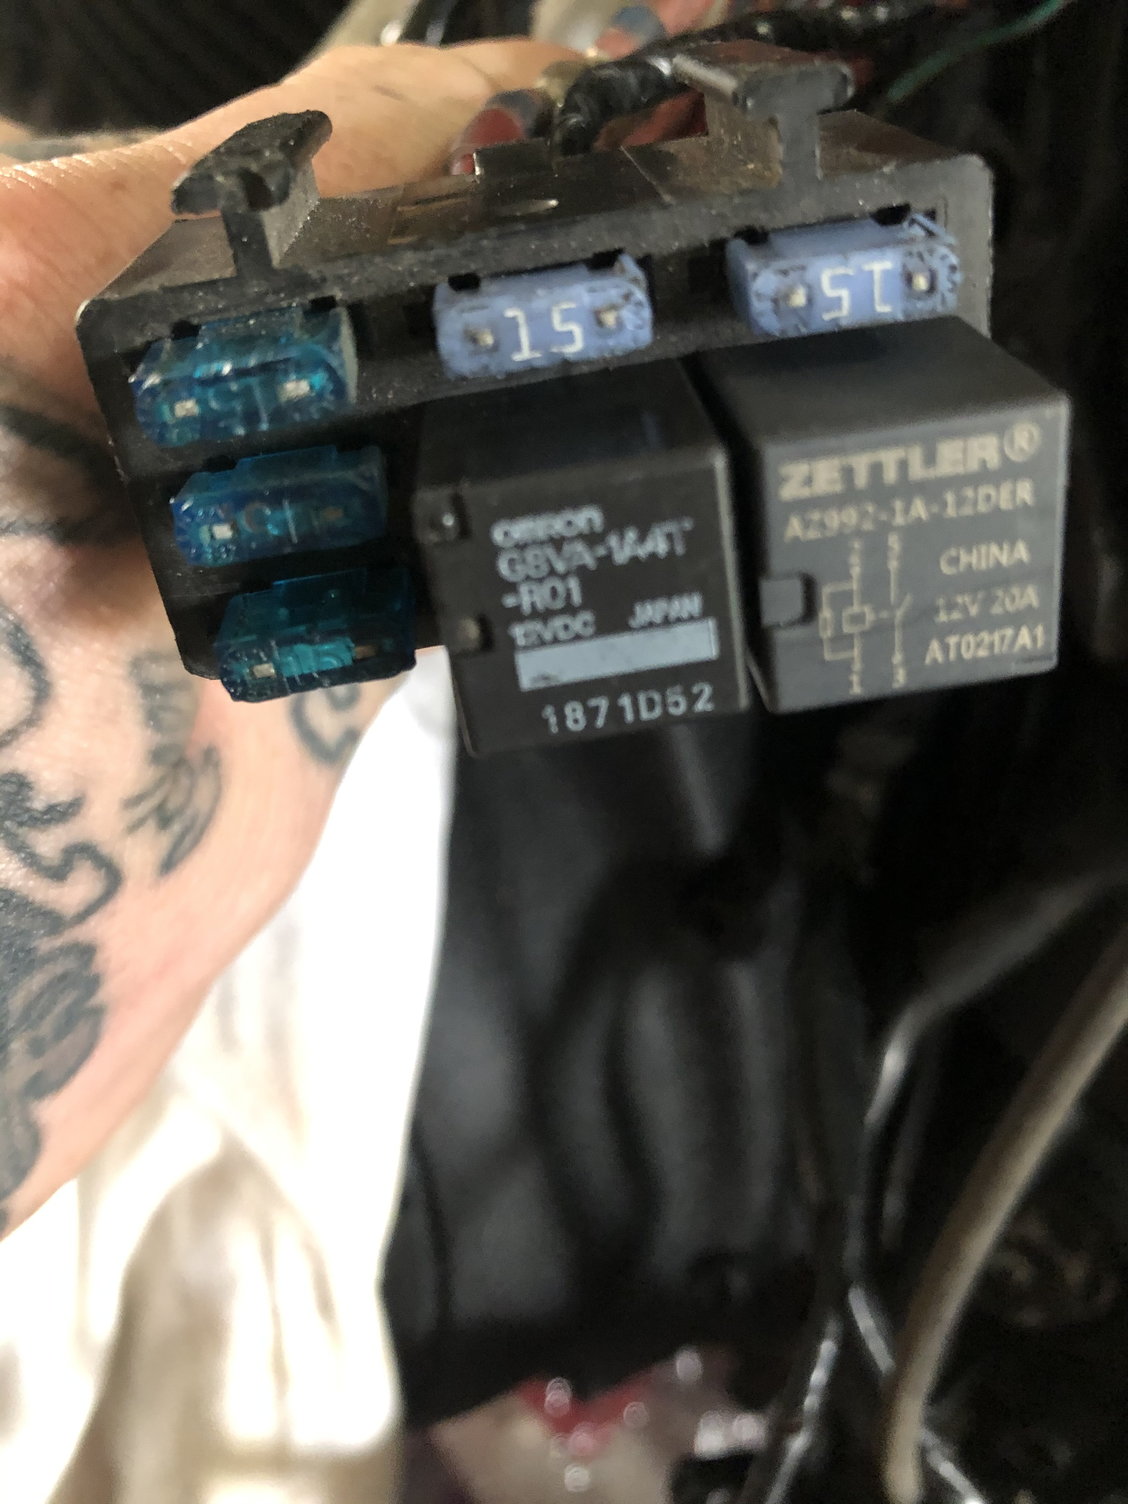
- Locate the relay box, usually under the seat.
- Open the relay box using a screwdriver.
- Identify the faulty relay inside the box.
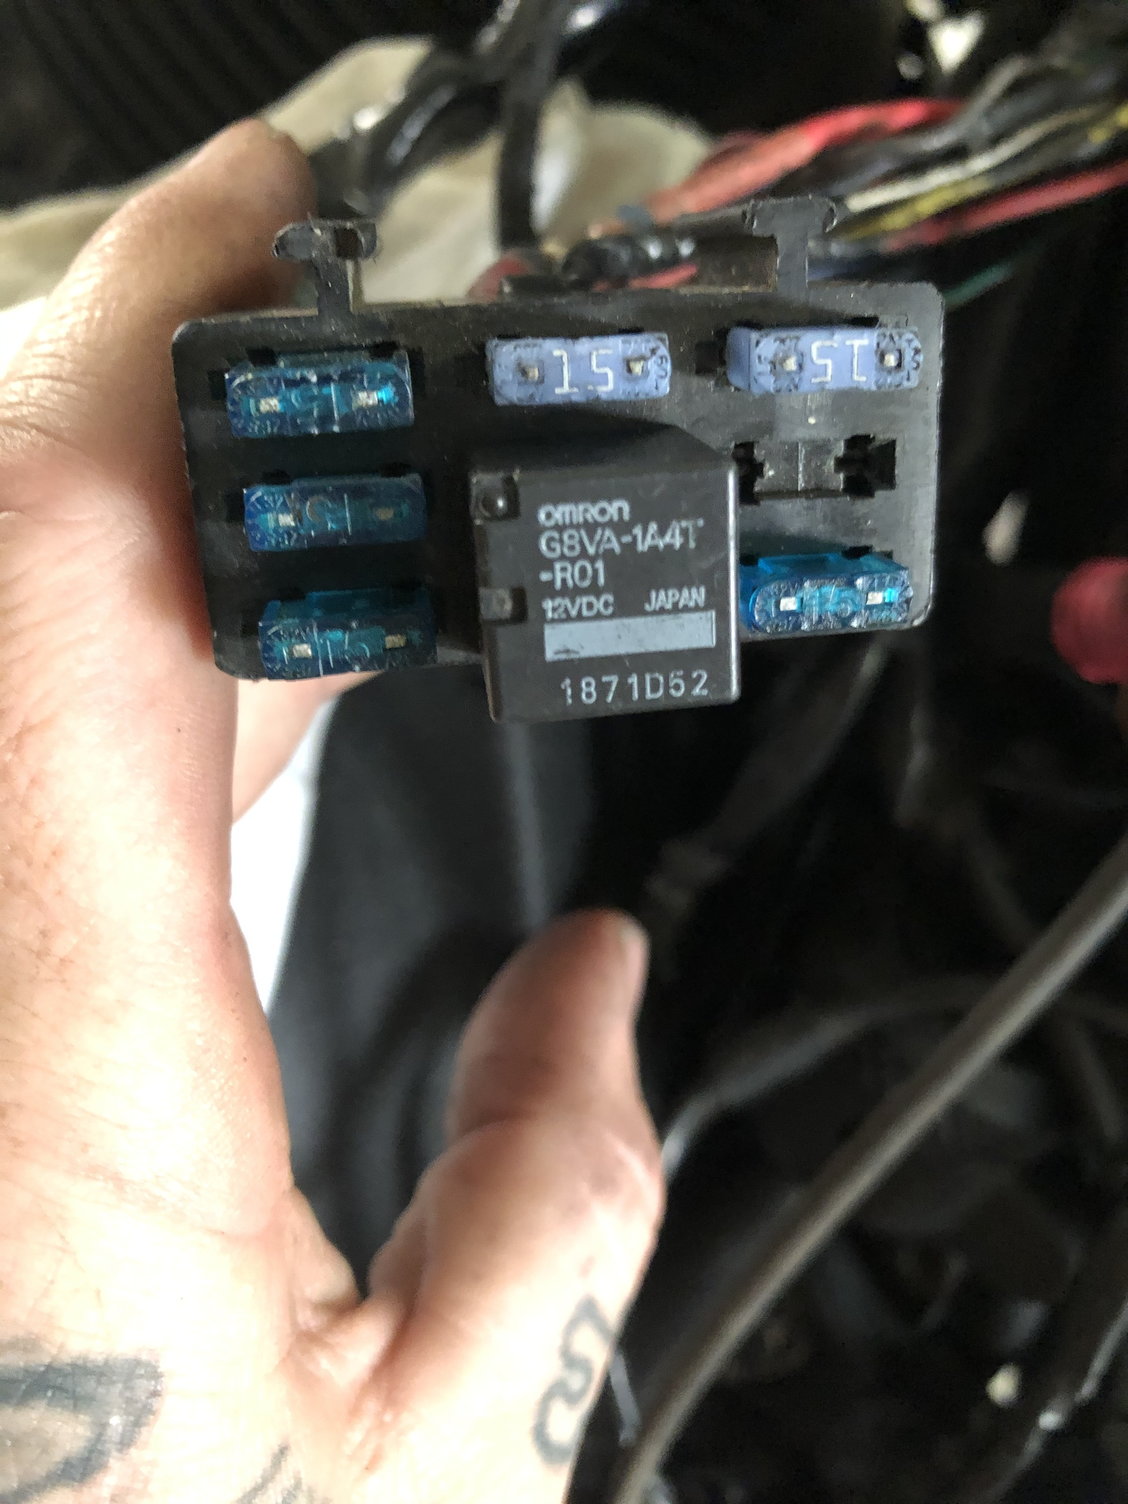
- Remove the faulty relay by gently pulling it out.
- Insert the new relay into the same slot.
- Secure the relay box cover with the screwdriver.
- Reconnect the battery and test the engine.
Replacing the relay can solve many electrical issues. Regular maintenance can prevent future problems. Keep your bike in top shape for a smooth ride.
Troubleshooting Electrical Connections
When riding a Harley Davidson, electrical issues can occur. Problems with the system relay are common. This section will help you troubleshoot these electrical connections.
Checking And Cleaning Connection Points
Dirty connection points cause many electrical problems. Use a multimeter to check these points. Ensure the connections are clean. Dirt and corrosion can block electrical flow. Clean the terminals with a wire brush. You can also use a contact cleaner spray.
Follow these steps to clean connection points:
- Turn off the motorcycle.
- Disconnect the battery.
- Locate the relay connections.
- Use a wire brush to clean terminals.
- Spray contact cleaner on the terminals.
- Let the terminals dry.
- Reconnect the battery.
Ensuring Secure Electrical Contacts
Loose connections can interrupt the electrical flow. Check all wiring and connectors. Make sure they are tight and secure. Use a screwdriver to tighten any loose screws.
Secure electrical contacts prevent future issues. Consider using dielectric grease. This grease protects connections from moisture and corrosion. Apply a small amount to each connection point.
Here are the steps to ensure secure contacts:
- Turn off the motorcycle.
- Inspect all electrical connections.
- Use a screwdriver to tighten loose connections.
- Apply dielectric grease to each connection.
- Reconnect the battery and start the motorcycle.
By following these steps, you can fix relay problems. Your Harley Davidson will run smoothly without electrical issues.

Credit: www.hdforums.com
Maintenance Tips To Prevent Relay Failures
Harley Davidson motorcycles are known for their rugged build and reliability. But even the best machines need maintenance. Relay failures can disrupt your ride. Follow these maintenance tips to prevent relay issues.
Regular Checks And Balances
Conducting regular checks on your Harley Davidson’s relay system is vital. Inspect the relays every month. Look for any signs of wear or damage. Ensure all connections are tight. Loose connections can cause relay failures.
Use a multimeter to test the relays. A healthy relay should show the correct voltage. Replace any relay that shows abnormal readings. Cleaning the relay contacts also helps. Use a contact cleaner to remove dirt and debris.
Keep a log of your inspections. Record dates, findings, and actions taken. This helps track the relay’s condition over time. It also provides a history for future reference.
Best Practices For Electrical System Care
Proper care of the electrical system extends relay life. Follow these best practices for optimal performance:
- Check the battery voltage regularly. Low voltage can damage relays.
- Ensure all wires are properly insulated. Exposed wires can cause shorts.
- Use the correct type of relays. Consult your Harley Davidson manual for specifications.
- Avoid overloading the electrical system. Too many accessories can strain the relays.
Maintain a clean environment around the electrical components. Dust and moisture can cause corrosion. Store your motorcycle in a dry place. Cover it to protect from elements.
Follow these tips to keep your Harley Davidson running smoothly. Prevent relay failures before they happen. Enjoy a trouble-free ride.
Professional Help Vs Diy
Experiencing system relay problems on your Harley Davidson can be frustrating. Deciding between professional help and DIY can be a tough choice. Understanding when to seek a mechanic’s assistance and the benefits of professional diagnostics can help you make an informed decision.
When To Seek A Mechanic’s Assistance
System relay issues may require expert intervention. Seek a mechanic’s assistance in these situations:
- Complex Electrical Problems: If you face complex electrical issues, consult a professional.
- Repeated Failures: If the relay fails repeatedly, professional help is needed.
- Special Tools Needed: Some relay problems require special tools only mechanics possess.
- Warranty Concerns: Visiting a mechanic helps maintain your warranty.
Benefits Of Professional Diagnostics
Professional diagnostics offer several advantages:
- Accurate Problem Identification: Mechanics use advanced tools to find issues quickly.
- Expertise and Experience: Professionals bring years of experience to solve complex problems.
- Time-Saving: Professional help saves time and effort in diagnosing problems.
- Guaranteed Work: Mechanics often provide guarantees on their work, ensuring peace of mind.
Comparing the benefits of professional help and DIY can guide your choice:
| Aspect | Professional Help | DIY |
|---|---|---|
| Cost | Higher, but includes expertise | Lower, but risk of errors |
| Time | Faster diagnosis | Potentially time-consuming |
| Accuracy | High accuracy | Varies based on skill |
| Tools | Specialized tools available | Limited to personal tools |
Understanding Harley Warranty And Support
Experiencing system relay problems with your Harley Davidson can be frustrating. Knowing your warranty details and support options is essential. This helps in resolving issues quickly and efficiently.
Navigating The Warranty For Electrical Components
Harley Davidson offers a comprehensive warranty for their bikes. Electrical components, including relays, are covered under this warranty. Understanding the coverage details is crucial for any rider.
The warranty generally covers defects in materials and workmanship. Always check your warranty document for specific terms and conditions. This ensures you know what is covered and for how long.
| Component | Warranty Coverage |
|---|---|
| Relays | Covered under electrical components warranty |
| Battery | Usually covered for 2 years |
| Wiring | Covered under electrical components warranty |
Leveraging Dealer Support For Relay Issues
Authorized Harley Davidson dealers provide excellent support. They can diagnose and fix relay issues efficiently. Always take your bike to an authorized dealer for any warranty repairs.
Dealers have trained technicians who understand Harley’s electrical systems. They use genuine parts, ensuring your bike remains in top condition. Contact your nearest dealer for assistance with relay problems.
- Visit the dealer’s service department.
- Explain the relay issue in detail.
- Provide your bike’s warranty information.
- Let the technicians diagnose and fix the problem.
Having a good relationship with your dealer can be beneficial. They can offer valuable advice and support, keeping your Harley running smoothly.
Real-world Case Studies
System relay problems in Harley Davidson motorcycles can be tricky. Let’s explore some real-world case studies. These stories highlight both successes and lessons learned. They provide valuable insights for Harley Davidson owners and enthusiasts.
Success Stories Of Quick Relay Fixes
Many riders have faced relay issues and fixed them quickly. Here are some success stories:
| Rider | Issue | Solution | Outcome |
|---|---|---|---|
| John Doe | Starter relay failure | Replaced relay | Bike started perfectly |
| Jane Smith | Headlight relay malfunction | Cleaned connections | Headlights worked |
| Mike Johnson | Horn relay issue | Checked fuse | Horn sounded |
Lessons Learned From System Relay Problems
Dealing with system relay problems teaches important lessons. Here are key takeaways:
- Always carry spare relays.
- Regularly check electrical connections.
- Keep the relay area clean and dry.
Some riders faced repeated relay failures. They discovered underlying issues:
- Poor grounding
- Faulty wiring
- Corroded connectors
Addressing these root causes prevented future problems. Regular maintenance and quick fixes help keep your Harley running smoothly.
Conclusion
Facing Harley Davidson system relay problems can be frustrating. Regular maintenance and timely checks can prevent these issues. Always use quality parts and consult professionals. By staying proactive, you can enjoy a smoother ride and avoid unexpected breakdowns. Keeping your Harley in top shape ensures a reliable and enjoyable experience.