Harley Davidson wiring color codes standardize electrical systems. These codes ensure correct connections and safety.
Harley Davidson motorcycles have a specific set of wiring color codes that simplify the identification and connection of electrical components. These color codes are essential for both DIY enthusiasts and professional mechanics when diagnosing and fixing electrical issues. Knowing these codes can save time and prevent costly mistakes.
For example, black typically represents ground wires, while red or orange often indicates power. Familiarizing yourself with these standard color codes can make working on your Harley Davidson both easier and safer. It is crucial for maintaining the bike’s performance and ensuring rider safety.
Introduction To Harley Davidson Wiring
Harley Davidson motorcycles are known for their iconic design and performance. One crucial aspect is the wiring system. Understanding the wiring color codes is essential. This helps in proper maintenance and troubleshooting.
The Importance Of Color Codes
Color codes make wiring tasks easier. They help identify wires quickly. Each color represents a specific function. This ensures safety and efficiency.
Here are some common color codes:
- Black: Ground
- Red: Power
- Green: Accessory
- Blue: Lights
Knowing these codes helps avoid mistakes. It also speeds up repair work.
Brief History Of Harley’s Electrical Systems
Harley Davidson has evolved over the years. Early models had simple wiring systems. They used basic color codes. As technology advanced, so did the wiring complexity.
By the 1980s, Harley introduced more electronics. This included advanced ignition systems and lighting. The wiring color codes became more standardized.
Today, Harley’s wiring systems are highly sophisticated. They integrate with modern features. This includes electronic fuel injection and advanced safety systems. Understanding these codes is vital for any enthusiast.
| Color | Function |
|---|---|
| Black | Ground |
| Red | Power |
| Green | Accessory |
| Blue | Lights |
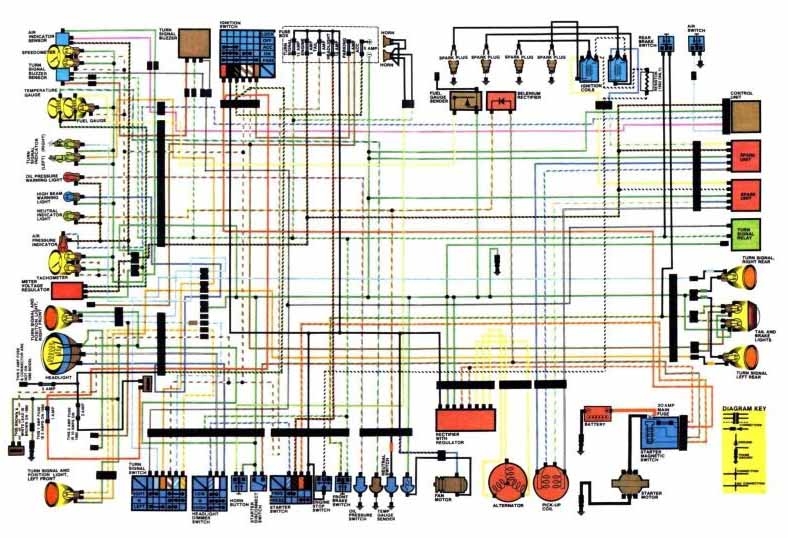
Credit: serviceinfo.harley-davidson.com
Deciphering The Color Code System
Understanding Harley Davidson wiring color codes is essential for any bike enthusiast. These color codes help you make sense of the wiring system. They ensure your bike runs smoothly and safely.
Basic Color Code Meanings
Harley Davidson wiring uses a set of basic colors. Each color has a specific function. Here’s a simple guide:
| Color | Function |
|---|---|
| Black | Ground |
| Red | Power |
| Green | Ignition |
| Yellow | Lights |
Striped Wires And Their Significance
Striped wires add another layer of complexity. They combine two colors to signify different functions. Here are some examples:
- Black with White Stripe: Ground for specific components.
- Red with Blue Stripe: Power to auxiliary systems.
- Green with Yellow Stripe: Ignition control.
- Yellow with Red Stripe: Signal lights.
Tools And Safety Precautions
Working on Harley Davidson wiring can be exciting yet challenging. Knowing the proper tools and safety precautions is essential. This guide will help you understand the necessary tools and safety measures for electrical work.
Essential Tools For Electrical Work
- Wire Strippers: These help in removing insulation from wires.
- Multimeter: Use it to measure voltage, current, and resistance.
- Soldering Iron: This is crucial for joining wires securely.
- Electrical Tape: Insulates and protects wire connections.
- Crimping Tool: For making strong wire connections with connectors.
Having the right tools ensures safety and efficiency. These tools help in handling Harley Davidson wiring color codes effortlessly.
Safety Measures When Handling Wiring
- Turn Off Power: Always switch off the power before starting work.
- Wear Gloves: Protect your hands from electrical shocks.
- Use Insulated Tools: They prevent accidental electric contact.
- Check Connections: Ensure all connections are tight and secure.
- Avoid Wet Areas: Water and electricity don’t mix. Work in dry conditions.
Following these safety measures can prevent accidents. Always prioritize your safety when working with electrical systems.
Common Color Codes And Their Functions
Understanding Harley Davidson wiring color codes is crucial for motorcycle enthusiasts. It helps in maintaining and troubleshooting electrical systems. Let’s explore the common color codes and their functions.
Power Supply Wires
Power supply wires are essential for the bike’s electrical system. They carry electricity to various components.
| Color Code | Function |
|---|---|
| Red | Primary power supply |
| Orange | Accessory power |
| Black/Red | Secondary power supply |
Grounding Wires
Grounding wires ensure the electrical system works safely. They complete the circuit by connecting to the ground.
- Black: Main ground wire
- Green: Secondary ground wire
Signal And Indicator Wires
Signal and indicator wires manage the bike’s lights and indicators. They provide signals to the rider.
- Blue: High beam indicator
- Brown: Turn signals
- Yellow: Left turn signal
- Purple: Right turn signal
These color codes help in identifying and fixing electrical issues. They ensure the smooth functioning of your Harley Davidson motorcycle.
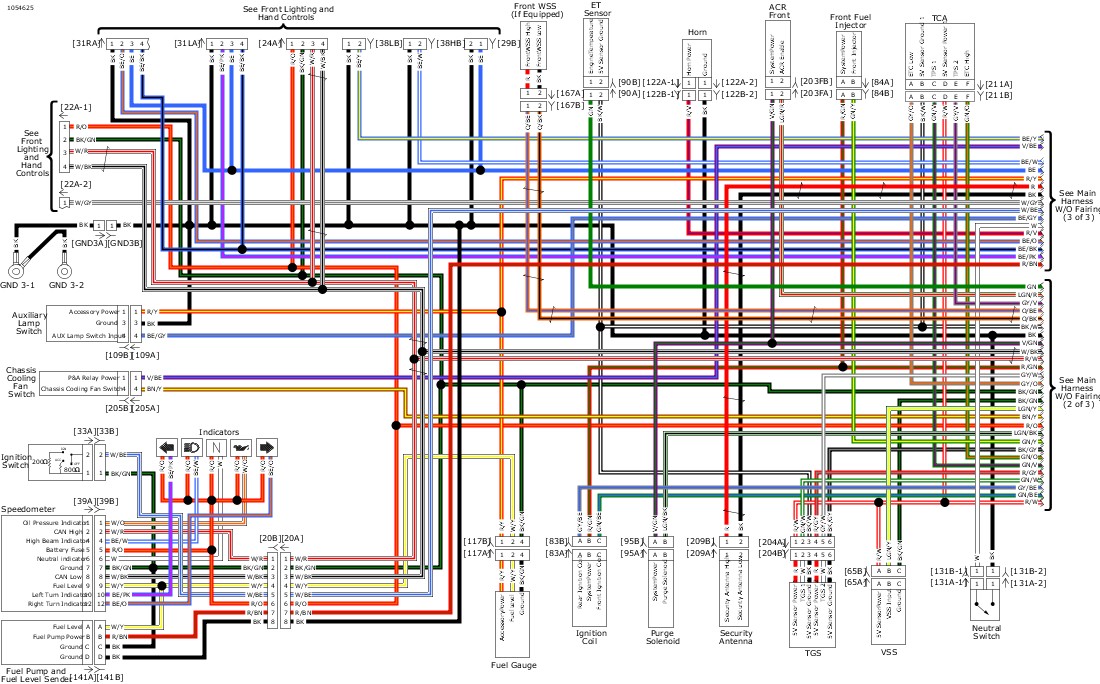
Wiring Diagrams And Schematics
Understanding Harley Davidson wiring color codes can be challenging. Wiring diagrams and schematics help simplify this process. They show how each wire connects and where it goes. Reading these diagrams is crucial for making repairs or modifications.
Reading Harley Davidson Schematics
Reading a schematic involves understanding symbols and color codes. Each wire has a specific color, representing its function. For example, black wires usually indicate ground connections.
| Color | Function |
|---|---|
| Black | Ground |
| Red | Power |
| Green | Signal |
| Blue | Lighting |
The table above shows some common wire colors and their functions. Knowing these colors helps in reading and understanding the schematics.
Sources For Wiring Diagrams
Finding accurate wiring diagrams is essential. Harley Davidson service manuals are the best source. These manuals contain detailed schematics for every model.
- Official Harley Davidson Service Manuals
- Online Forums and Communities
- Specialized Repair Websites
Many online forums have user-submitted diagrams. They can be helpful but always verify their accuracy. Specialized repair websites often sell detailed diagrams for various models.
Using trusted sources ensures you get the most accurate information. This makes your work easier and safer.

Credit: www.pinterest.com
Troubleshooting Wiring Issues
Harley Davidson motorcycles are known for their performance and reliability. Yet, wiring issues can still occur. Understanding the wiring color codes helps in troubleshooting these problems effectively.
Identifying Common Electrical Problems
Common electrical problems can disrupt your ride. Knowing these issues helps in quick diagnosis:
- Dead Battery: The bike won’t start or lights are dim.
- Blown Fuses: Specific electrical components stop working.
- Short Circuits: Wires may spark or burn out.
- Loose Connections: Intermittent power loss or flickering lights.
Using Color Codes For Troubleshooting
Harley Davidson uses specific color codes for wiring. These codes make troubleshooting easier. Here is a table of common color codes:
| Wire Color | Function |
|---|---|
| Black | Ground |
| Red | Power |
| Green | Ignition |
| Orange | Accessory |
| Blue | Lighting |
Follow these steps for troubleshooting:
- Identify the problem area.
- Refer to the color code table.
- Check for any loose connections.
- Inspect the wires for damage.
- Replace faulty wires if needed.
Using these steps helps in resolving wiring issues fast. Ensure you have a wiring diagram specific to your Harley Davidson model.
Upgrades And Customizations
Harley Davidson enthusiasts love to make their bikes unique. Upgrades and customizations are common among riders. Changing the wiring and upgrading the electrical system can enhance performance. This section will guide you through some of these exciting modifications.
Changing The Wiring For Custom Builds
Custom builds often require new wiring setups. Understanding wiring color codes is essential. Each wire color has a specific function. Using the correct colors ensures safety and efficiency.
Here’s a simple table of common wiring color codes:
| Color | Function |
|---|---|
| Black | Ground |
| Red | Power |
| Green | Signal |
Always refer to your bike’s manual for specific color codes. Mistakes can lead to short circuits or malfunctions.
Upgrading The Electrical System
Upgrading the electrical system can boost your bike’s performance. Adding new LED lights or a modern sound system can be exciting. New components may require different wiring.
Here are some steps to consider:
- Identify the components you wish to upgrade.
- Refer to the color code table for accurate wiring.
- Use quality connectors and ensure secure connections.
Follow these steps for a successful upgrade. Proper planning prevents issues down the road.
Upgrading the electrical system can also include new batteries or charging systems. Ensure you select parts compatible with your bike model.
Customizing a Harley Davidson is a rewarding experience. Following proper wiring color codes ensures safety and functionality. Always use the right tools and materials for the best results.
Maintenance And Care For Electrical Components
Maintaining your Harley Davidson’s electrical components is crucial. Proper care ensures the longevity of your bike’s wiring system. Regular checks can prevent potential issues. Knowing the Harley Davidson wiring color codes helps in identifying and troubleshooting problems.
Routine Checks For Wiring Integrity
Regularly inspect your bike’s wiring for wear and tear. Look for any exposed wires. Check for frayed or damaged insulation. Use a multimeter to test for continuity. Ensure all connections are secure. Loose connections can cause electrical failures. Clean the contacts to avoid corrosion.
| Wiring Component | Check Frequency | Action Required |
|---|---|---|
| Battery Cables | Monthly | Inspect and clean |
| Fuse Box | Quarterly | Check fuses and connections |
| Lighting Wires | Bi-Annually | Inspect for wear |
When To Seek Professional Help
If you notice frequent electrical issues, seek professional help. An expert can diagnose complex wiring problems. Attempting to fix it yourself can lead to more damage. Look for these warning signs:
- Persistent electrical failures
- Smell of burning wires
- Frequent fuse blowouts
Professional mechanics have the tools and knowledge. They can accurately identify and fix issues. They can also provide advice on preventative maintenance.
Credit: serviceinfo.harley-davidson.com
Conclusion
Understanding Harley Davidson wiring color codes can simplify your bike maintenance. It ensures quick and accurate troubleshooting. Familiarize yourself with these codes for a smoother experience. This knowledge can save time and effort. Stay informed and keep your Harley running efficiently.
Happy riding!