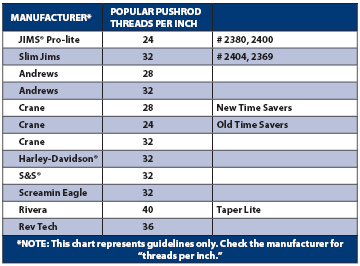
The Harley pushrod adjustment chart provides guidelines for setting the correct pushrod length. Proper adjustment ensures optimal engine performance.
Harley-Davidson motorcycles rely heavily on precise mechanical adjustments for optimal performance. One crucial aspect is the pushrod adjustment, which affects the engine’s efficiency and longevity. The pushrod adjustment chart serves as a valuable tool for bikers and mechanics alike. It outlines the specific measurements and steps required to achieve the correct pushrod length.
Following the chart ensures that the engine operates smoothly, reducing wear and tear. Proper pushrod adjustments can also improve fuel efficiency and power output. Regular maintenance using the pushrod adjustment chart is essential for keeping your Harley in top shape. Always refer to the manufacturer’s guidelines for the most accurate information.

Credit: www.melling.com
Introduction To Harley Pushrod Adjustment
Harley pushrod adjustment is essential for maintaining your motorcycle’s engine. Proper adjustment ensures that your engine runs smoothly and efficiently. This guide will help you understand the importance and effects of adjusting pushrods.
Importance Of Proper Pushrod Adjustment
Proper pushrod adjustment prevents engine damage. Misaligned pushrods can lead to serious issues. Incorrect pushrod settings can cause valve damage and poor engine performance. Adjusting pushrods correctly improves engine reliability and longevity.
Effects On Engine Performance
Proper pushrod adjustment impacts engine performance. Well-adjusted pushrods ensure optimal valve timing. This improves fuel efficiency and power output. Misadjusted pushrods can cause engine knocking and poor acceleration. Regular adjustment maintains peak engine performance.
| Pushrod Adjustment Step | Description |
|---|---|
| Step 1 | Loosen the locknut on the pushrod. |
| Step 2 | Turn the adjuster to the correct length. |
| Step 3 | Tighten the locknut to secure the adjustment. |
Regular pushrod adjustments are crucial for engine health. Follow the steps and check your motorcycle’s manual for specifics. Keep your Harley running at its best with proper pushrod maintenance.
Essential Tools For Pushrod Adjustment
Adjusting the pushrods on your Harley is a crucial task. Using the right tools ensures the job is done efficiently and accurately. This guide will cover the essential tools you need for a successful pushrod adjustment.
Pushrod Adjustment Tools
To adjust pushrods, specific tools are required. Here’s a list of must-have tools:
- Pushrod Tube Removal Tool: This tool helps remove the pushrod tubes easily.
- Adjustable Wrenches: Used to loosen and tighten the pushrod nuts.
- Torque Wrench: Ensures bolts are tightened to the correct specification.
Each tool has a specific purpose. Ensure you have all these tools before you start the adjustment process.
Measurement Instruments
Accurate measurements are vital for pushrod adjustments. Below are essential measurement instruments:
- Feeler Gauges: Used to measure the gap between the pushrod and the valve.
- Dial Caliper: Measures the length of the pushrod accurately.
- Micrometer: Provides precise measurements for pushrod thickness.
Using these instruments will help you achieve precise adjustments. Always double-check your measurements to ensure accuracy.
Understanding Your Harley’s Engine
Understanding your Harley’s engine is essential for optimal performance. A crucial component in this process is the pushrod adjustment. The pushrod adjustment chart helps you maintain your Harley’s engine efficiency. Let’s dive into the engine types and the role of pushrods.
Engine Types And Pushrod Configurations
Harley-Davidson engines come in various types, each with unique pushrod configurations. Here are the most common:
- Evolution Engine: Known for its reliability and performance.
- Twin Cam Engine: Features two camshafts for better valve control.
- Milwaukee-Eight Engine: Offers improved power and efficiency.
Each engine type has distinct pushrod configurations. Understanding these configurations is crucial. The pushrod adjustment chart provides specific settings for each engine type.
Role Of Pushrods In Valve Operation
Pushrods play a vital role in your Harley’s valve operation. They transfer motion from the camshaft to the valves. This ensures your engine runs smoothly.
Here’s a breakdown of their role:
- Camshaft Motion: The camshaft rotates, creating motion.
- Pushrod Action: Pushrods transfer this motion to the valves.
- Valve Operation: Valves open and close at precise times, ensuring optimal performance.
Proper pushrod adjustment ensures efficient valve operation. An accurate pushrod adjustment chart helps achieve this. Always refer to this chart for precise settings.
| Engine Type | Pushrod Adjustment |
|---|---|
| Evolution Engine | Refer to specific chart values |
| Twin Cam Engine | Refer to specific chart values |
| Milwaukee-Eight Engine | Refer to specific chart values |
Always use the pushrod adjustment chart for your Harley engine. This ensures your bike runs at its best.
.jpg?sfvrsn=0)
Credit: www.sscycle.com
Pre-adjustment Preparations
Preparing your Harley engine for pushrod adjustment is crucial. This ensures accurate and smooth performance. Follow these steps to get started.
Engine Warming And Cooling
Warming the engine is the first step. Start the engine and let it run. Keep it running until it reaches its normal operating temperature. This usually takes about 10 minutes.
Once warmed, shut the engine off. Allow it to cool until it is safe to touch. This cooling period is important for accurate pushrod adjustment. The engine must be cool to avoid burns and ensure proper adjustments.
Accessing The Pushrods
Locate the pushrods by removing the rocker covers. Use a wrench to carefully unscrew the bolts. Place the bolts in a safe spot to avoid losing them.
Once the covers are off, you will see the pushrod tubes. Slide the tubes up to expose the pushrods. Ensure the tubes are securely held in place to avoid obstruction during adjustment.
| Step | Action | Tools Needed |
|---|---|---|
| 1 | Warm the engine | None |
| 2 | Cool the engine | None |
| 3 | Remove rocker covers | Wrench |
| 4 | Slide up pushrod tubes | None |
Follow these steps for a smooth pushrod adjustment. Ensuring proper engine warming and cooling, and accessing pushrods correctly will save time and avoid errors.
Step-by-step Adjustment Process
Adjusting the pushrods on your Harley can seem daunting. With a detailed step-by-step process, it becomes manageable. Follow these simple steps for accurate adjustment.
Locating The Adjustment Points
First, locate the adjustment points on your Harley. These points are crucial. Follow these steps to find them:
- Remove the pushrod covers.
- Identify the pushrod adjusters.
- Ensure the engine is cold.
Ensure you have the necessary tools. A wrench and a feeler gauge are essential.
Setting The Correct Lash
Setting the correct lash is critical for performance. Follow these steps to set the lash accurately:
- Rotate the engine to the correct position.
- Use the wrench to loosen the locknut.
- Adjust the pushrod to the desired lash.
- Use the feeler gauge to check the lash.
- Tighten the locknut securely.
Repeat these steps for each pushrod. Ensure each pushrod has the correct lash.
For a quick reference, use the table below:
| Step | Action |
|---|---|
| 1 | Rotate the engine |
| 2 | Loosen the locknut |
| 3 | Adjust the pushrod |
| 4 | Check the lash |
| 5 | Tighten the locknut |
Accurate adjustments ensure your Harley runs smoothly. Follow the chart and steps carefully.
Tuning For Different Riding Conditions
Adjusting Harley pushrods is crucial for optimal performance. Different riding conditions require specific adjustments. This ensures your Harley runs smoothly, whether you’re cruising daily or pushing performance limits.
Adjustments For Performance Riding
Performance riding demands precise adjustments. To achieve this, follow these steps:
- Ensure the engine is cool.
- Remove the pushrod covers.
- Check the pushrod length against the chart.
- Adjust the pushrod length to the recommended settings.
- Reinstall the pushrod covers.
For performance riding, consider these key points:
- Shorter Pushrods: Enhance valve timing for higher RPMs.
- Tighter Adjustments: Improve throttle response.
- Regular Checks: Maintain top performance.
Adjustments For Everyday Use
Everyday riding requires different adjustments. These ensure reliability and comfort. Follow these steps for everyday use:
- Ensure the engine is cool.
- Remove the pushrod covers.
- Check the pushrod length against the chart.
- Adjust the pushrod length to the recommended settings.
- Reinstall the pushrod covers.
Consider these points for everyday riding:
- Standard Pushrod Length: Ensures balanced performance and durability.
- Moderate Adjustments: Provide smooth, steady power delivery.
- Periodic Maintenance: Keeps the engine running efficiently.
Pushrod Adjustment Chart
| Condition | Adjustment |
|---|---|
| Performance Riding | Shorter, tighter adjustments |
| Everyday Use | Standard length, moderate adjustments |
Troubleshooting Common Issues
Working on your Harley can be rewarding. Sometimes, you might face issues with the pushrods. These problems can be fixed easily. Let’s discuss common issues and their solutions.
Identifying Adjustment Errors
Errors in pushrod adjustments can cause engine issues. Here are signs to watch out for:
- Engine noise: A ticking sound might mean loose pushrods.
- Poor performance: Misadjusted pushrods can reduce engine power.
- Overheating: Incorrect adjustments can lead to overheating.
Use the following chart to check for adjustment errors:
| Error | Possible Cause | Solution |
|---|---|---|
| Ticking sound | Loose pushrod | Tighten the pushrod |
| Poor performance | Misadjusted pushrod | Readjust the pushrod |
| Overheating | Incorrect adjustment | Check and adjust again |
Solving Pushrod-related Problems
If you face pushrod issues, follow these steps:
- Check the pushrods: Ensure they are not bent or damaged.
- Refer to the adjustment chart: Use the chart for correct settings.
- Test the engine: Run the engine and listen for unusual noises.
- Readjust if needed: Fine-tune the pushrods if you hear any noise.
For a smoother ride, keep your pushrods in top shape. Regular checks and adjustments help maintain performance.
Maintaining Your Adjustments
Keeping your Harley pushrods in perfect condition is vital. Regular adjustments ensure the engine runs smoothly. This section will guide you on how to maintain your adjustments effectively.
Regular Check-ups And Maintenance Tips
Regular check-ups are crucial. Inspect your pushrods every 5,000 miles. Look for signs of wear and tear. Use the following tips to maintain your pushrods:
- Keep your engine clean.
- Use high-quality oil.
- Check for unusual noises.
- Tighten loose parts.
Cleanliness is essential for smooth operation. Dirt and grime can damage pushrods. Use a soft cloth to wipe away debris.
High-quality oil reduces friction. Change the oil every 3,000 miles. This keeps the pushrods lubricated.
Unusual noises can indicate problems. Listen for knocking or clattering sounds. Investigate and fix the issue promptly.
Loose parts can cause misalignment. Ensure all bolts and screws are tight. This prevents unnecessary wear.
When To Readjust Your Pushrods
Knowing when to readjust your pushrods is key. Here are some signs that indicate it’s time:
- Engine misfires frequently.
- Reduced engine performance.
- Increased fuel consumption.
- Unusual engine vibrations.
Frequent engine misfires can signal a need for adjustment. This affects the overall performance.
Reduced performance is another sign. If your bike feels sluggish, check the pushrods.
Increased fuel consumption also indicates a problem. Properly adjusted pushrods ensure efficient fuel use.
Unusual vibrations can mean misalignment. Readjust the pushrods to eliminate these vibrations.
Regular maintenance and timely adjustments keep your Harley running smoothly. Follow these tips to enjoy a better ride.
Advanced Tips For Veteran Riders
Veteran riders know the importance of maintaining their Harley Davidson. Fine-tuning the pushrods can significantly enhance performance. This section will guide experienced riders through advanced tips. Let’s dive into the specifics of fine-tuning and custom modifications.
Fine-tuning For Optimal Performance
Fine-tuning pushrods can make your Harley run smoother. Precision is key to achieving optimal performance. Follow these steps for precise adjustments:
- Measure the Pushrod Length: Use a micrometer for accurate measurements.
- Check the Valve Clearance: Ensure there is no excessive play.
- Adjust the Pushrods: Turn the pushrod adjuster nut to fine-tune.
- Recheck Measurements: Verify your adjustments with a micrometer.
Remember to use high-quality tools. Proper tools ensure precision and efficiency.
Custom Modifications And Upgrades
Veteran riders often seek custom modifications. Custom mods can enhance both performance and style. Here are some popular options:
- High-Performance Pushrods: These offer better durability and stability.
- Performance Cams: Upgrading cams can improve engine output.
- Adjustable Pushrods: These provide easier and more precise adjustments.
Consider these upgrades for a more powerful and efficient ride. High-performance pushrods and adjustable pushrods can make significant differences. Performance cams can further enhance your bike’s capabilities.
Here’s a quick reference table for pushrod adjustments:
| Adjustment Step | Recommended Setting |
|---|---|
| Initial Length | 3.5 inches |
| Valve Clearance | 0.005 inches |
| Final Adjustment | 3.45 inches |
Use this table as a guideline. Ensure your measurements are precise for optimal performance.

Credit: hammerperf.com
Conclusion
Understanding the Harley pushrod adjustment chart is crucial for optimal performance. Proper adjustments ensure a smoother ride. Always refer to your specific Harley model’s manual. Regular maintenance can prevent costly repairs. Keep your bike in top shape by following these guidelines.
Happy riding!