To check the primary oil on a Harley Davidson, locate the primary chaincase and remove the inspection cover. Ensure the oil level is up to the bottom of the clutch plate.
Regular maintenance of your Harley Davidson is crucial for optimal performance and longevity. Checking the primary oil is a simple yet essential task. The primary oil lubricates the primary chain, clutch, and associated components. Keeping this oil at the correct level helps prevent wear and tear.
You only need a few basic tools to perform this check. Doing it yourself can save you time and money. Plus, it helps you understand your bike better. Always use the recommended oil type for your specific Harley model. Regular checks ensure a smoother, safer ride.
Introduction To Primary Oil Maintenance
Maintaining your Harley Davidson’s primary oil is essential. This ensures your bike runs smoothly and efficiently. Regular checks can prevent serious engine problems. Let’s dive into the basics of primary oil maintenance.
Importance Of Regular Checks
Regular checks of your primary oil keep your engine healthy. Primary oil lubricates the primary chain and clutch. Without it, parts can wear out quickly. Regular checks can save you from expensive repairs. It also helps in identifying any leaks early on. Keeping an eye on your primary oil level is crucial.
Tools Needed For The Task
Having the right tools makes the job easier. Here’s a list of essential tools:
- Drain pan
- Socket wrench set
- Primary cover gasket
- Torque wrench
- Primary oil
- Cleaning rags
Make sure you have all these tools handy. This will ensure a smooth and hassle-free check.
Credit: blog.amsoil.com
Identifying Your Harley Model
Checking the primary oil on a Harley Davidson is essential. First, you need to identify your Harley model. Each model has different specifications and unique features. Knowing your model helps in finding the primary oil compartment easily.
Different Models And Specifications
Harley Davidson has a variety of models. Some popular ones include:
- Sportster
- Softail
- Touring
- Dyna
Each model has different specifications. The Sportster is known for its agility. The Softail offers a smooth ride. Touring models are built for long journeys. Dyna models are versatile and powerful.
| Model | Feature |
|---|---|
| Sportster | Agility |
| Softail | Smooth Ride |
| Touring | Long Journeys |
| Dyna | Versatility |
Locating The Primary Oil Compartment
After identifying your model, locate the primary oil compartment. The location varies based on the model.
- For Sportster models, find it near the primary chaincase.
- Softail models have it near the clutch cover.
- On Touring models, it’s close to the transmission case.
- Dyna models have it beside the primary drive.
Always refer to your owner’s manual for precise locations. Each model has specific instructions. Ensure you follow them carefully.
Preparing Your Motorcycle
Before checking the primary oil on your Harley Davidson, preparation is key. Proper preparation ensures a smooth and safe inspection process. Follow these steps to get your motorcycle ready for oil checking.
Safety Measures Before Starting
- Make sure the engine is cool. Hot engines can cause burns.
- Use gloves to protect your hands from oil and grime.
- Wear safety goggles to protect your eyes from oil splashes.
- Ensure your motorcycle is on a flat, stable surface.
Proper Positioning For Inspection
- Place your Harley Davidson on a level ground.
- Use a motorcycle stand for extra stability.
- Ensure the bike is upright and not leaning.
- Locate the primary cover on the left side of the bike.
| Step | Action |
|---|---|
| 1 | Ensure the engine is cool. |
| 2 | Wear gloves and safety goggles. |
| 3 | Place the bike on level ground. |
| 4 | Use a stand for stability. |
These steps ensure safety and proper positioning for oil checking. Following them will make the process smooth and easy.
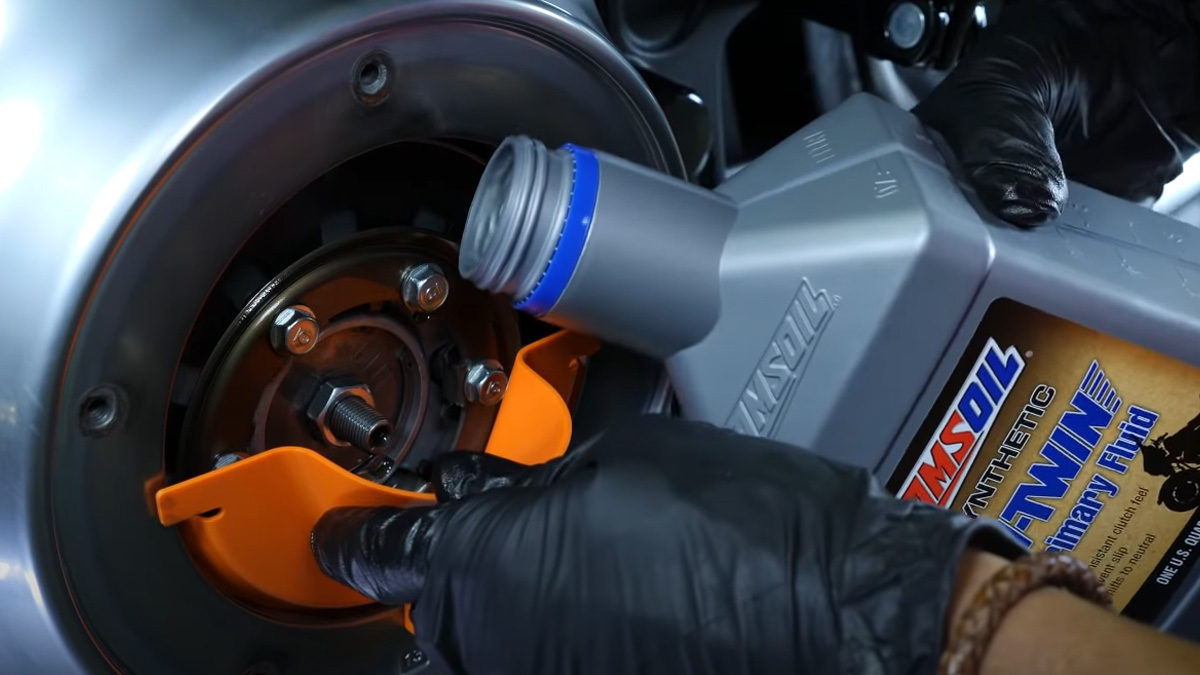
Accessing The Primary Oil
Checking the primary oil on your Harley Davidson is crucial. It ensures your bike runs smoothly and efficiently. Let’s dive into the steps for accessing the primary oil.
Removing The Inspection Cover
First, locate the inspection cover on your Harley Davidson. It’s usually on the left side of the bike. Use a screwdriver to remove the screws holding the cover. Keep the screws in a safe place to avoid losing them. Carefully lift the inspection cover off to access the primary oil.
Understanding The Inspection Process
With the inspection cover removed, you can see the primary oil. Use a flashlight if necessary for better visibility. Check the oil level using the dipstick attached to the cover. The oil should be between the minimum and maximum marks. If the level is low, you need to add more oil. Ensure the oil is clean and free from debris. Dirty oil can harm your bike’s performance.
Assessing The Oil Level
Checking the primary oil level on your Harley Davidson is crucial. It ensures your bike runs smoothly and avoids engine damage. Follow these steps to check the oil level correctly.
Reading The Oil Level Correctly
Begin by ensuring your bike is on a level surface. This helps get an accurate reading. Warm up the engine for a few minutes, then turn it off. Locate the oil dipstick on the primary case.
- Remove the dipstick carefully.
- Wipe it clean with a rag.
- Reinsert the dipstick fully, then remove it again.
Check the oil level on the dipstick. It should be between the minimum and maximum marks. If it’s below the minimum, you need to add more oil.
Interpreting The Results
Understanding the dipstick readings is essential. If the oil level is too low, it can cause engine wear. If it’s too high, it can lead to excess pressure and leaks.
| Oil Level | Action Required |
|---|---|
| Below Minimum | Add oil until it reaches the correct level. |
| Between Min and Max | No action needed. The oil level is correct. |
| Above Maximum | Remove some oil to reach the correct level. |
Regularly checking your primary oil level can prevent costly repairs. Make it a habit to check before long rides. This ensures your Harley Davidson stays in top condition.
Quality Check For The Primary Oil
Maintaining your Harley Davidson involves checking the primary oil. This ensures the engine runs smoothly. A quality check helps identify contaminants and discoloration. Regularly inspecting the oil can prevent potential issues.
Identifying Contaminants And Discoloration
Start by draining a small amount of primary oil. Look for any particles or debris. These are signs of contaminants. Healthy oil should be clear and free of particles.
Next, check the color of the oil. Fresh oil is usually a light amber. Discolored oil may appear dark or murky. This indicates it might need changing. Discoloration often points to degraded oil quality.
When To Change The Primary Oil
Changing the primary oil depends on several factors. Mileage is a primary factor. Typically, change it every 5,000 miles.
Another factor is the color and consistency of the oil. Dark or thick oil needs changing sooner. Regular rides in harsh conditions also necessitate frequent changes.
Refer to your Harley Davidson’s manual. It provides specific guidelines for your model. Keeping up with these changes ensures optimal performance.
Refilling Or Topping Off Primary Oil
Maintaining the primary oil in your Harley Davidson is crucial. It ensures smooth operation and extends the life of your bike. Regularly checking and refilling the primary oil keeps the engine running efficiently. This section will guide you through selecting the right oil and provide a step-by-step guide to refilling or topping off primary oil.
Selecting The Right Oil For Your Harley
Choosing the right oil is important for your Harley Davidson. Using the wrong oil can damage the engine. Always refer to your Harley’s manual for the recommended oil type. Typically, a synthetic primary oil is preferred. Look for oils with high wear protection and thermal stability.
| Oil Type | Benefits |
|---|---|
| Synthetic Primary Oil | High wear protection, thermal stability |
| Mineral Oil | Cost-effective, good for older models |
Step-by-step Guide To Refilling
Follow these steps to refill or top off your primary oil:
- Park your Harley on a level surface.
- Turn off the engine and let it cool.
- Locate the primary oil fill plug on the primary cover.
- Unscrew the fill plug with a wrench.
- Check the oil level using a dipstick.
- If low, slowly add the recommended oil.
- Use a funnel to avoid spills.
- Fill until the oil reaches the correct level.
- Replace the fill plug and tighten it securely.
- Wipe off any spilled oil from the surface.
Regular maintenance of your Harley Davidson ensures longevity and peak performance. Always use the recommended oil and follow these steps for a smooth ride.
Credit: www.reddit.com
Reassembling And Final Checks
After checking the primary oil on your Harley Davidson, it is vital to reassemble and perform final checks. This ensures your bike runs smoothly and safely. Follow these steps to complete the process.
Reinstalling The Inspection Cover
Start by reinstalling the inspection cover. First, ensure the gasket is in good condition. If it is damaged, replace it with a new one. Align the cover properly with the primary housing.
- Position the cover over the gasket.
- Insert the screws into the holes.
- Tighten the screws evenly, using a crisscross pattern.
Using a torque wrench, tighten the screws to the manufacturer’s specified torque. This prevents leaks and ensures a secure fit.
Ensuring Everything Is Secure
After reinstalling the inspection cover, check all bolts and screws. Ensure everything is tight and secure. Loose components can cause issues while riding.
- Check the primary cover bolts.
- Inspect the clutch cover screws.
- Verify the foot peg bolts are tight.
Double-check the oil level to confirm it is correct. Look for any leaks around the inspection cover. If there are any, tighten the screws again.
Your Harley Davidson is now ready for the road. Regular maintenance keeps it performing at its best.
Maintenance Tips And Best Practices
Proper maintenance of your Harley Davidson ensures a smooth ride. Checking the primary oil is crucial. It keeps your engine running efficiently. Follow these tips for the best practices.
Frequency Of Primary Oil Checks
Regular checks prevent potential issues. Check the primary oil every 5,000 miles. If you ride frequently, consider more frequent checks. Always refer to your Harley Davidson manual.
Keeping Records And Schedules
Keeping records helps track maintenance. Create a maintenance schedule. Note the date and mileage after each check. Use a notebook or a digital app.
Here’s a sample table to keep records:
| Date | Mileage | Oil Level | Action Taken |
|---|---|---|---|
| 01/01/2023 | 5,000 | Full | Checked |
| 06/01/2023 | 10,000 | Half | Added Oil |
Keeping a schedule ensures timely checks. It avoids unnecessary wear and tear. Keeping records helps identify patterns. It makes future maintenance easier.
Troubleshooting Common Issues
Riding a Harley Davidson is a thrilling experience. Yet, sometimes issues arise with the primary oil. Understanding these problems helps in maintaining your bike. This section addresses common issues and solutions.
Dealing With Leaks
Leaks in the primary oil can be frustrating. First, check the oil plug. Ensure it is tight. Look for visible oil spots under the bike. These may indicate a leak. Inspect the primary cover gasket. A worn gasket often causes leaks. Replace it if needed.
Use a flashlight to check for cracks in the primary cover. Cracks can also cause leaks. If you find a crack, replace the cover. Regularly check the oil level. Low oil can cause damage.
Addressing Overheating Concerns
Overheating is a serious issue. First, check the oil level. Low oil causes the engine to overheat. Fill it to the proper level. Ensure there are no leaks. Leaks can lower the oil level and cause overheating.
Inspect the primary chain tension. A tight chain can overheat. Adjust it to the correct tension. Check the cooling system. Ensure the cooling fins are clean. Dirty fins can cause overheating.
Use the correct type of oil. Wrong oil can cause overheating. Refer to the Harley Davidson manual for the recommended oil type. Regular maintenance helps prevent these issues.

Credit: www.youtube.com
Conclusion
Regularly checking your Harley Davidson’s primary oil ensures peak performance and longevity. Follow these simple steps for a smooth ride. Proper maintenance helps prevent costly repairs and enhances your bike’s overall health. Keep your Harley roaring by prioritizing routine oil checks and enjoy the open road with confidence.