To determine Harley tail light wire colors, consult the bike’s wiring diagram or use a multimeter. This ensures accuracy and prevents errors.
Understanding the wiring of your Harley tail light is essential for maintenance and customization. The tail light wiring typically involves different colors for various functions like braking, signaling, and running lights. Knowing these colors helps in troubleshooting electrical issues or installing aftermarket lights.
Using a wiring diagram or a multimeter to identify wire colors can save time and avoid potential mistakes. It’s crucial to follow the correct procedure to ensure the safety and functionality of your bike’s lighting system. This guide will help you navigate the process effectively and efficiently.
Introduction To Harley Tail Light Wiring
Harley Davidson motorcycles are iconic. Many riders enjoy customizing their bikes. One common area for customization is the tail light. Understanding the Harley tail light wiring is crucial. It ensures both functionality and safety. This guide helps you determine the wire colors for your Harley tail light.
The Importance Of Proper Wiring
Proper wiring is essential for the tail light. It ensures the light works correctly. Incorrect wiring can lead to malfunctions. This can affect the brake light and turn signals. Proper wiring improves your bike’s visibility. This helps keep you safe on the road.
Safety Considerations
Working with electrical components requires caution. Always disconnect the battery first. This prevents any electrical shocks. Use a multimeter to check for current. Ensure all connections are secure. Loose wires can cause short circuits. This can damage your bike’s electrical system.
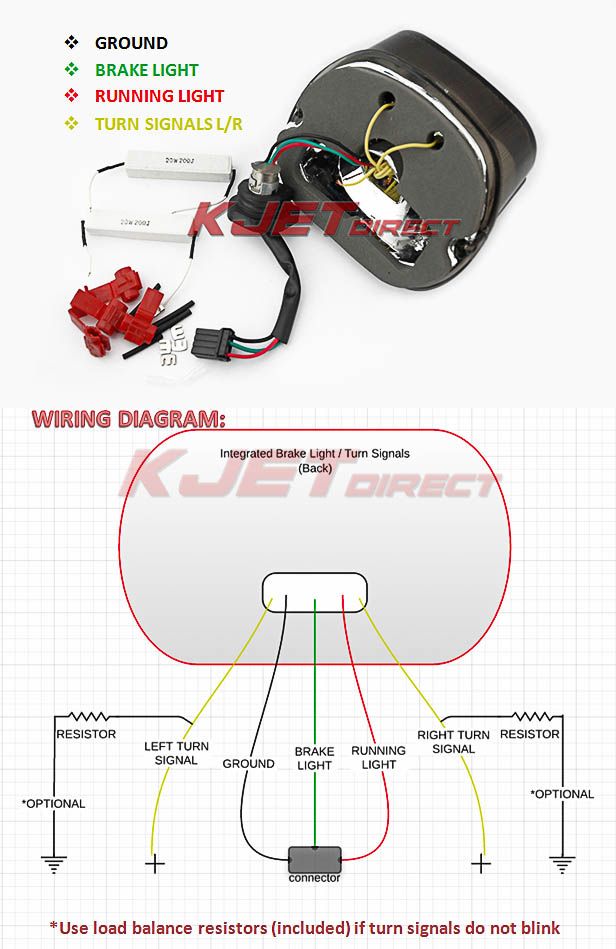
| Wire Color | Function |
|---|---|
| Black | Ground |
| Red | Brake Light |
| Blue | Running Light |
| Yellow | Left Turn Signal |
| Green | Right Turn Signal |
Refer to your Harley’s manual for specific wiring diagrams. This ensures accuracy. Each model might have slight variations. Always double-check before making any connections.
Tools And Materials Needed
Determining the wire colors for your Harley tail light is essential. Knowing the right tools and materials is the first step. This section will help you gather everything you need.
Electrical Toolkit Essentials
Having the right electrical tools makes the job easier. Here are the essentials:
- Multimeter: Measures voltage, current, and resistance.
- Wire Strippers: Helps strip the insulation off wires.
- Crimping Tool: Used for creating strong wire connections.
- Electrical Tape: Insulates and secures wire connections.
- Screwdrivers: Both flathead and Phillips for various screws.
Additional Supplies
Besides the electrical tools, you will need some additional supplies:
- Wiring Diagram: A must-have to identify wire colors.
- Replacement Bulbs: In case any bulbs are faulty.
- Connectors: For joining wires securely.
- Heat Shrink Tubing: Provides a professional finish and insulation.
Below is a table summarizing the essential tools and additional supplies:
| Tool/Supply | Purpose |
|---|---|
| Multimeter | Measures electrical values |
| Wire Strippers | Strips wire insulation |
| Crimping Tool | Creates wire connections |
| Electrical Tape | Insulates wire connections |
| Screwdrivers | For various screws |
| Wiring Diagram | Identifies wire colors |
| Replacement Bulbs | In case of faulty bulbs |
| Connectors | Joins wires securely |
| Heat Shrink Tubing | Provides insulation |
Identifying The Tail Light Wires
Identifying the correct tail light wires on your Harley is crucial. It ensures proper functionality and safety. This guide will help you understand the wire colors. Follow these steps to identify them correctly.
Color Coding Standards
Harley-Davidson uses specific color codes for their wiring. These codes help in identifying the function of each wire. Here is a basic breakdown:
| Wire Color | Function |
|---|---|
| Black | Ground |
| Red | Brake Light |
| Blue | Tail Light |
| Yellow | Left Turn Signal |
| Green | Right Turn Signal |
Consult your Harley’s manual for specific codes. This table provides a general guideline.
Interpreting Wire Colors
To interpret the wire colors, follow these steps:
- Disconnect the battery: This ensures safety while working.
- Locate the tail light assembly: Remove the necessary parts to access it.
- Identify the wires: Use the color coding standards table.
- Match each wire: Connect them as per their function. For example, connect the red wire for the brake light.
Use a multimeter to double-check the connections. This ensures accuracy and functionality.
Understanding these wire colors is essential. It helps in maintaining and repairing your Harley effectively.
Disconnecting The Battery
Before diving into the wiring, it’s essential to disconnect your Harley’s battery. This ensures your safety and prevents any electrical mishaps. Disconnecting the battery is a crucial step you can’t skip.
Safety First: Power Off
Ensure your Harley is parked on a stable surface. Turn off the ignition switch. This will cut off the power supply. Always wear insulated gloves for extra protection. Remember, safety should be your top priority.
Step-by-step Battery Disconnection
- Locate the battery compartment. This is usually under the seat.
- Use a wrench to loosen the screws on the battery cover.
- Remove the battery cover carefully. Set it aside safely.
- Identify the negative terminal first. This is often marked with a minus (-) sign.
- Use a wrench to loosen the bolt on the negative terminal.
- Disconnect the negative cable. Ensure it doesn’t touch the battery.
- Next, locate the positive terminal marked with a plus (+) sign.
- Loosen the bolt on the positive terminal using a wrench.
- Disconnect the positive cable. Keep it away from the battery.
| Step | Action |
|---|---|
| 1 | Park on a stable surface |
| 2 | Turn off the ignition switch |
| 3 | Wear insulated gloves |
| 4 | Loosen battery cover screws |
| 5 | Remove battery cover |
| 6 | Identify and loosen negative terminal |
| 7 | Disconnect negative cable |
| 8 | Identify and loosen positive terminal |
| 9 | Disconnect positive cable |
After completing these steps, your battery is safely disconnected. Now, you can proceed with determining the tail light wire colors. This preparation ensures a smooth and safe process.
Removing The Tail Light Assembly
Before determining the Harley tail light wire colors, you need to remove the tail light assembly. This process is simple with the right tools and steps. Follow this guide to ensure a smooth removal.
Tools For Removal
To remove the tail light assembly, you will need a few tools. These include:
- Screwdriver set (Phillips and flathead)
- Socket wrench set
- Plastic trim removal tool
- Pair of gloves for safety
Step-by-step Guide
- Park your Harley on a flat surface. Turn off the engine.
- Put on your gloves. This protects your hands.
- Locate the screws holding the tail light assembly.
- Use a Phillips screwdriver to remove the screws.
- Gently pull the tail light assembly out.
- Disconnect the wiring harness from the tail light.
- Use the plastic trim removal tool to carefully detach any clips.
- Set the tail light assembly aside in a safe place.
| Step | Action |
|---|---|
| 1 | Park on a flat surface |
| 2 | Wear gloves |
| 3 | Locate screws |
| 4 | Remove screws |
| 5 | Pull out assembly |
| 6 | Disconnect wiring harness |
| 7 | Detach clips |
| 8 | Store safely |
By following these steps, you can easily remove the tail light assembly. This allows you to check the Harley tail light wire colors with ease.
Testing Wire Functions
Understanding the wire functions of your Harley tail light is crucial. It helps ensure proper installation and troubleshooting. This section will guide you through testing wire functions. We’ll focus on using a multimeter and identifying live wires. These steps will make the process easier and safer.
Using A Multimeter
A multimeter is an essential tool for testing wire functions. It measures voltage, current, and resistance. Follow these steps to use a multimeter effectively:
- Set your multimeter to the voltage setting.
- Connect the black probe to the ground wire.
- Touch the red probe to each wire to measure voltage.
- Record the readings for each wire.
If you see a voltage reading, the wire is active. No reading means the wire is inactive.
Identifying Live Wires
Identifying live wires is essential for safety. Here’s how to do it:
- Check the voltage readings: Active wires will show voltage. Ground wires will not.
- Use color codes: Most Harley tail lights use specific colors. Common colors include red for brake lights and black for ground wires.
- Test with a test light: Connect the test light to the ground. Touch each wire to see if the light turns on.
By following these steps, you can easily identify live wires. This ensures correct installation and reduces the risk of accidents.
Troubleshooting Common Issues
Troubleshooting Harley tail light wire colors can sometimes be tricky. Below are common issues and solutions.
Dim Or Non-functioning Lights
Dim or non-functioning tail lights are common problems. They can be caused by several factors. Check the tail light bulb first. A burnt-out bulb is a simple fix. Replace it and see if the light works.
Next, inspect the wire connections. Loose or corroded connections can cause issues. Clean the connections and tighten them securely. Sometimes, the ground wire may be loose. Ensure it is firmly attached to the frame.
Use a multimeter to check voltage levels. Low voltage can cause dim lights. Check the battery and charging system. Make sure they are working properly.
Short Circuits And Fixes
Short circuits can cause tail lights to fail. They can also blow fuses. First, inspect the wiring for visible damage. Look for frayed wires or exposed copper.
Use a continuity tester to check the circuit. This can help you find breaks in the wire. If a short is found, replace or repair the damaged section.
Ensure all wires are properly insulated. Use electrical tape or heat shrink tubing. This can prevent future shorts.
Finally, check the fuse box. Replace any blown fuses. Make sure to use the correct fuse rating.
| Issue | Possible Cause | Solution |
|---|---|---|
| Dim Lights | Low Voltage | Check Battery and Charging System |
| Non-Functioning Lights | Burnt-Out Bulb | Replace Bulb |
| Short Circuit | Damaged Wire | Repair or Replace Wire |
Credit: www.harley-davidsonforums.com
Reinstalling The Tail Light Assembly
After determining the Harley tail light wire colors, it’s time to reinstall the tail light assembly. This step ensures your bike’s lighting system is functional and safe. Follow these steps carefully for a successful reinstallation.
Ensuring Proper Connections
Begin by connecting the wires to the tail light. Match each wire color with its corresponding terminal. Use your diagram for reference. It’s important to secure each connection tightly. Loose connections can cause lights to malfunction.
Check each wire for any signs of wear or damage. Replace any damaged wires before proceeding. Use electrical tape to cover any exposed wire sections. This prevents short circuits.
| Wire Color | Function |
|---|---|
| Red | Brake Light |
| Black | Ground |
| Blue | Tail Light |
Final Checks Before Use
After making all connections, double-check each one. Ensure there are no loose wires. Turn on your motorcycle and test the tail light. Check if the brake light and tail light work properly.
- Press the brake pedal and check the brake light.
- Turn on the headlights to test the tail light.
- Wiggle the wires to ensure they are secure.
If everything works, you have successfully reinstalled the tail light assembly. If there are issues, recheck the connections and wire colors.
Tips For Maintenance And Upgrades
Determining the wire colors for Harley tail lights can be tricky. Knowing how to maintain and upgrade them ensures safety and style. Here are some tips to help you out.
Regular Maintenance Schedule
Regular maintenance keeps your Harley running smoothly. Follow this schedule:
- Check the tail light wiring every three months.
- Inspect for any frayed or damaged wires.
- Clean the tail light lens monthly.
- Replace burnt-out bulbs immediately.
Always use high-quality wiring for your Harley tail lights. This prevents issues and ensures longevity.
Upgrading Tail Lights
Upgrading your Harley tail lights enhances visibility and style. Here are some steps:
- Choose LED tail lights for better brightness.
- Ensure the new tail lights are compatible with your Harley model.
- Disconnect the battery before starting the upgrade.
- Follow the wiring diagram to match the wire colors correctly.
Color-coded wires make installation easier. Typically, the color codes are:
| Wire Color | Function |
|---|---|
| Black | Ground |
| Red | Brake Light |
| Blue | Running Light |
| Yellow | Turn Signal |
Always double-check the wiring diagram specific to your Harley model. This ensures all connections are correct.
Using heat shrink tubing protects the connections from weather and wear.
Credit: www.harley-davidsonforums.com
Credit: www.youtube.com
Conclusion
Understanding Harley tail light wire colors is crucial for safe and efficient modifications. Follow the wiring diagram for accuracy. Always double-check connections to avoid issues. This guide simplifies the process, ensuring your Harley’s tail light functions perfectly. Enjoy a well-lit ride with confidence and ease.
Stay safe on the road.