To install Harley exhaust gaskets, remove the old gaskets and insert new ones into the exhaust ports. Ensure they fit snugly.
Installing new exhaust gaskets on your Harley-Davidson can enhance performance and reduce noise. Proper installation is crucial for optimal engine function. This guide will walk you through the process with clear, concise steps. Tools required include a wrench, screwdriver, and replacement gaskets.
Always use high-quality gaskets to ensure a perfect seal. Properly installed gaskets prevent exhaust leaks, which can affect engine performance and fuel efficiency. Whether you are a seasoned rider or a beginner, this guide will help you achieve a perfect installation. Follow these steps to keep your Harley running smoothly and efficiently.
Introduction To Harley Exhaust Gasket Installation
Installing exhaust gaskets on a Harley motorcycle is essential. The gaskets ensure a tight seal between the exhaust pipes and engine. A good seal helps in maintaining performance and reducing noise. This guide will help you understand the process.
The Role Of Exhaust Gaskets
Exhaust gaskets play a crucial role in your Harley’s performance. They seal the gap between the exhaust manifold and the engine. This prevents exhaust gases from escaping. A proper seal ensures optimal engine performance and reduces noise.
Without gaskets, exhaust gases can leak. This can lead to reduced power and increased emissions. It can also cause damage to other engine components. Therefore, gaskets are essential for maintaining your Harley’s health.
Signs Of A Worn Gasket
Recognizing a worn gasket is key to maintaining your Harley. Here are some signs to look out for:
- Increased noise: A faulty gasket may cause louder exhaust noises.
- Decreased performance: Leaking exhaust gases can reduce engine power.
- Unusual smells: You might notice a strong exhaust odor.
- Visible damage: Inspect for any visible cracks or wear on the gasket.
If you notice any of these signs, it might be time to replace the gasket. A timely replacement can save you from more extensive repairs.
Follow this guide to ensure a smooth installation process.

Credit: www.amazon.com
Tools And Materials Needed
Installing Harley exhaust gaskets requires the right tools and materials. This guide ensures you have everything you need for a smooth installation.
List Of Required Tools
- Socket set: Various sizes for different bolts.
- Torque wrench: Ensures bolts are tightened correctly.
- Wrench set: Essential for removing and tightening nuts.
- Screwdrivers: Phillips and flathead types.
- Gasket scraper: Removes old gasket material.
- Cleaning cloth: Keeps surfaces clean and debris-free.
- Lubricant: Helps with the removal of stubborn bolts.
- Safety gear: Gloves and safety glasses.
Choosing The Right Gasket
Choosing the correct gasket for your Harley exhaust is crucial. Not all gaskets fit every model.
- Consult your Harley manual for specifications.
- Purchase gaskets from a trusted supplier.
- Ensure the gasket is heat-resistant and durable.
- Double-check the part number for compatibility.
Proper tools and materials ensure a seamless installation process. Follow this guide to get started on your Harley exhaust gasket installation.
Preparation Steps
Before installing Harley exhaust gaskets, proper preparation ensures a smooth process. Follow these steps to get ready for installation.
Motorcycle Safety
Ensure your motorcycle is stable. Use a motorcycle lift or center stand. This prevents any unwanted movement.
- Turn off the engine and let it cool.
- Disconnect the battery to avoid electric shocks.
- Wear protective gloves and safety glasses.
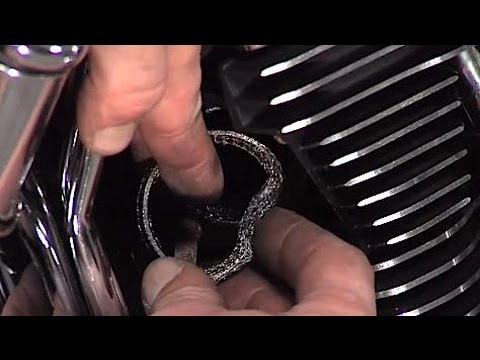
Removing The Old Gasket
Removing the old gasket is crucial for a proper fit.
- Locate the exhaust manifold where the gasket sits.
- Use a wrench to loosen the bolts.
- Carefully remove the old gasket.
- Clean the gasket area using a rag or brush.
Ensure no debris remains in the area. A clean surface allows the new gasket to seal correctly.

Credit: www.youtube.com
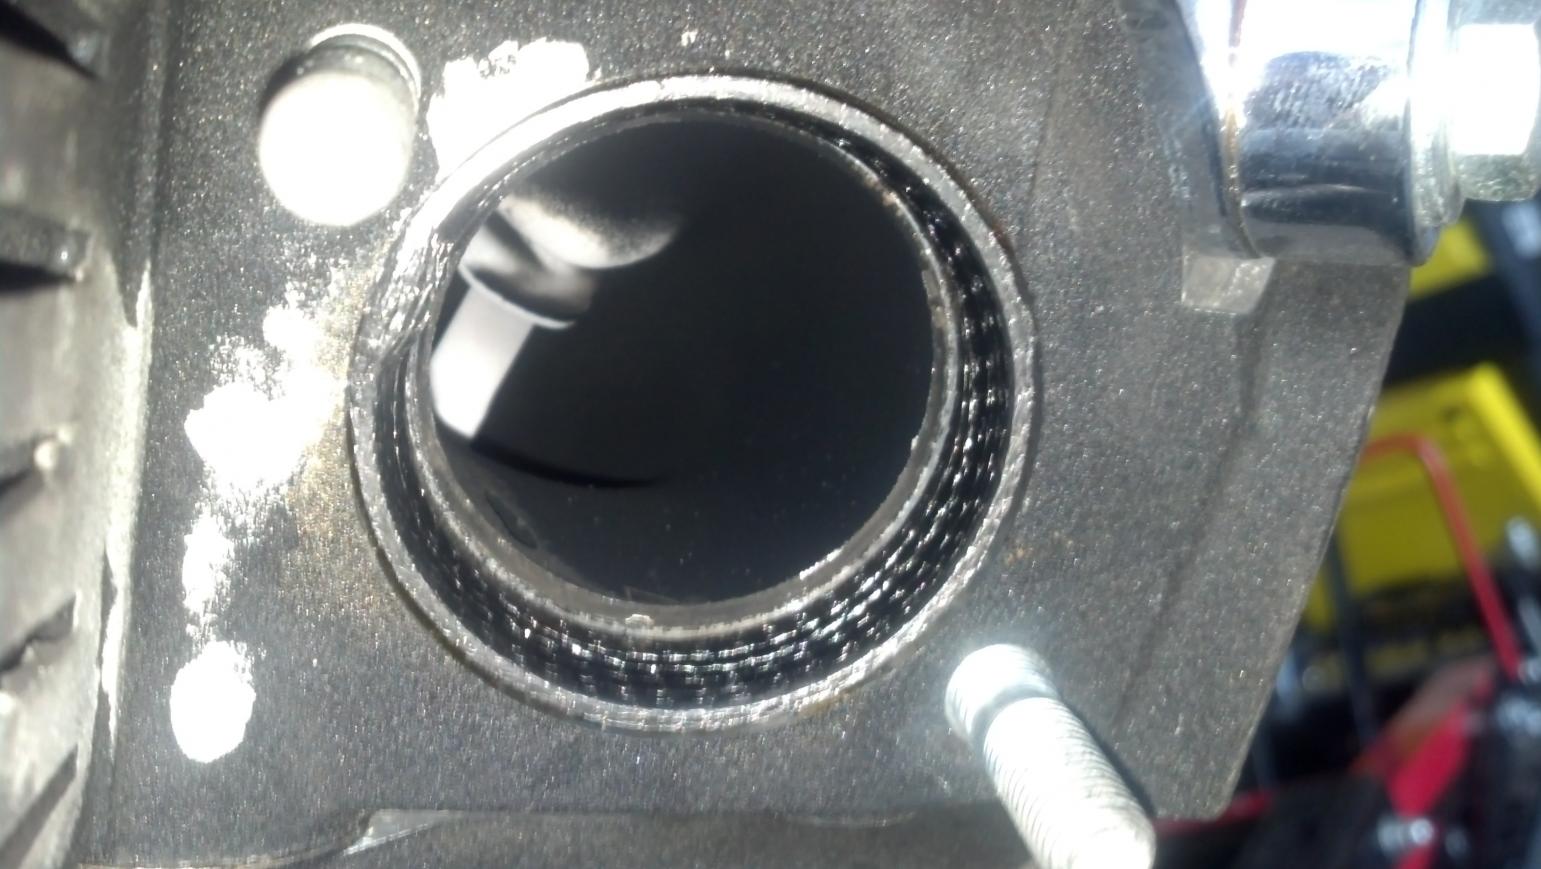
Cleaning The Exhaust Surface
Before installing new Harley exhaust gaskets, cleaning the exhaust surface is essential. A clean surface ensures a proper seal and prevents leaks. Follow these steps to make sure your exhaust surface is spotless.
Proper Cleaning Techniques
Start by gathering your cleaning supplies. You will need a wire brush, a soft cloth, and a non-abrasive cleaner. Make sure these items are nearby.
- Use the wire brush to remove old gasket material.
- Apply the non-abrasive cleaner to the surface.
- Scrub the surface gently with the wire brush.
- Wipe away any residue with the soft cloth.
Be thorough in your cleaning process. Any leftover dirt or gasket material could affect the seal.
Inspecting The Surface
Once the surface is clean, inspect it carefully. Look for any signs of damage or wear.
- Check for cracks or dents.
- Ensure the surface is smooth and even.
- Use a flashlight to get a better view.
If you find any damage, fix it before installing the new gaskets. A damaged surface can lead to leaks, affecting your bike’s performance.
Cleaning and inspecting the exhaust surface is a crucial step. It ensures a secure and long-lasting seal for your Harley exhaust gaskets.
Positioning The New Gasket
Installing a new Harley exhaust gasket requires precision. The correct positioning ensures a tight seal. This step is crucial for avoiding leaks and maintaining performance. Let’s delve into some key tips for positioning the new gasket effectively.
Alignment Tips
Begin by cleaning the exhaust flange. Remove any old gasket material. Ensure the surface is smooth and free of debris.
- Place the new gasket on the exhaust port.
- Align the holes in the gasket with the bolts.
- Use your fingers to hold the gasket in place.
- Start threading the bolts by hand to secure the gasket.
Double-check the alignment before tightening the bolts. Misalignment can cause leaks and damage.
Avoiding Common Mistakes
Avoid over-tightening the bolts. This can crush the gasket and cause leaks.
- Use a torque wrench for precise tightening.
- Follow the manufacturer’s recommended torque settings.
Do not reuse old gaskets. Always install a new gasket for a proper seal.
| Common Mistakes | Solutions |
|---|---|
| Over-tightening bolts | Use a torque wrench |
| Reusing old gaskets | Always use a new gasket |
| Misalignment | Align holes before tightening |
Credit: www.hdforums.com
Securing The Gasket In Place
Installing Harley exhaust gaskets requires precision. Securing the gasket ensures a proper seal and prevents leaks. Follow these steps to secure your gasket correctly.
Bolt Tightening Sequence
Following the correct bolt tightening sequence is crucial. Start by hand-tightening each bolt. This helps in aligning the gasket properly.
Next, use a wrench to tighten the bolts in a crisscross pattern. This method applies even pressure across the gasket. Here’s the tightening sequence:
- Tighten the top left bolt.
- Move to the bottom right bolt.
- Tighten the top right bolt.
- Finish with the bottom left bolt.
Repeat this sequence until all bolts are snug.
Torque Specifications
Using the correct torque specifications is essential. Over-tightening can damage the gasket. Under-tightening can lead to leaks.
Refer to your Harley manual for exact torque settings. Generally, the torque specifications for Harley exhaust gaskets are:
| Bike Model | Torque (lb-ft) |
|---|---|
| Sportster | 15-20 |
| Softail | 18-22 |
| Touring | 20-25 |
Use a torque wrench to apply the correct force.
Reattaching The Exhaust System
Reattaching the exhaust system is the final step in installing Harley exhaust gaskets. It ensures your bike runs smoothly and reduces noise. Let’s dive into the important steps for a proper reattachment.
Ensuring A Proper Seal
A proper seal is essential for your bike’s performance. A poor seal can cause leaks and affect engine efficiency.
- Check the gasket for any damages.
- Ensure the gasket is seated correctly.
- Align the exhaust flanges properly.
Make sure there is no gap or misalignment. This will ensure a tight seal.
Reassembly Steps
- Place the exhaust pipe back onto the header.
- Insert the bolts and tighten them by hand.
- Use a torque wrench to tighten the bolts to the manufacturer’s specifications.
- Reconnect any clamps or brackets.
- Check all connections for tightness.
Following these steps ensures your exhaust system is reattached securely. Always follow the recommended torque settings for your Harley model.
Final Checks And Testing
Once you have successfully installed your Harley exhaust gaskets, it is crucial to perform final checks and testing. This ensures that the installation is secure and functioning correctly. Follow these steps to guarantee optimal performance and safety.
Leak Testing Methods
To check for leaks, you can use a few simple methods:
- Visual Inspection: Look for any visible gaps or misalignments around the gaskets.
- Soapy Water Test: Apply soapy water to the gasket area. Start the engine and look for bubbles.
- Smoke Test: Use a smoke machine to detect leaks. Smoke will escape from areas with leaks.
Post-installation Inspection
After checking for leaks, conduct a thorough post-installation inspection:
- Torque Verification: Ensure all bolts and nuts are properly torqued to the manufacturer’s specifications.
- Heat Shields: Check that heat shields are securely in place.
- Exhaust Alignment: Verify that the exhaust system is properly aligned and not touching other components.
By following these steps, you ensure your Harley runs smoothly and safely.
Maintenance Tips For Longevity
Installing Harley exhaust gaskets correctly is crucial. Proper maintenance ensures they last longer. Follow these simple tips to keep your gaskets in top shape.
Regular Check-ups
Conduct regular check-ups on your exhaust system. Look for signs of wear and tear. This helps catch issues early.
Inspect the gaskets every few months. Ensure they are not leaking. Leaks can cause poor performance.
Use a flashlight to see better. Check for cracks or breaks. Replace damaged gaskets immediately.
When To Replace The Gasket
Knowing when to replace the gasket is key. A worn gasket can affect bike performance.
If you hear unusual noises, check the gasket. Exhaust leaks often cause loud sounds.
Observe the gasket’s color. A dark or burnt gasket needs replacement.
Regular replacement extends the life of your exhaust system.
Additional Tips
- Use quality gaskets for better durability.
- Keep the exhaust system clean and free of debris.
- Follow manufacturer guidelines for maintenance.
Troubleshooting Common Issues
Installing Harley exhaust gaskets can sometimes bring unexpected problems. Troubleshooting these issues early ensures your bike runs smoothly. This section addresses two common problems: leaks and unusual noises.
Addressing Leaks
Leaks are a frequent problem with exhaust gaskets. Here’s how to identify and fix them:
- Identify the leak: Look for soot marks or listen for hissing sounds. These signs indicate a gasket leak.
- Tighten bolts: Use a torque wrench to ensure bolts are tight. Loose bolts cause leaks.
- Replace damaged gaskets: Inspect the gasket for damage. If it’s cracked or worn, replace it immediately.
Dealing With Unusual Noises
Unusual noises from the exhaust can signal a problem. Follow these steps to address it:
- Check for loose parts: Inspect the exhaust system. Tighten any loose components.
- Listen for rattling: Rattling sounds often come from loose heat shields. Secure them properly.
- Examine the gasket: A damaged gasket can cause odd noises. Replace it if necessary.
By addressing leaks and unusual noises promptly, you ensure your Harley performs at its best. Regular maintenance and careful installation make a significant difference.
Conclusion
Installing Harley exhaust gaskets is a straightforward task with the right tools and steps. Following this guide ensures a secure fit, preventing leaks and enhancing performance. Regular maintenance helps keep your Harley running smoothly. Enjoy the ride with confidence, knowing your exhaust system is properly installed.
Happy riding!