To read a Harley Davidson oil dipstick, remove it from the oil tank and wipe it clean. Reinsert it fully, then remove it again to check the oil level.
Maintaining the correct oil level in your Harley Davidson is crucial for optimal performance and longevity. The oil dipstick is a straightforward tool that helps you monitor the engine oil level. Regular checks ensure your bike runs smoothly and prevents potential engine damage.
Understanding how to read the oil dipstick correctly can save you from costly repairs. Always perform this simple task before long rides to ensure your bike is in top condition. A few minutes of maintenance can make a significant difference in your riding experience.

Credit: www.hdforums.com
Introduction To Harley Davidson Oil Maintenance
Maintaining your Harley Davidson is essential for its performance. Regular oil checks ensure the engine runs smoothly. Knowing how to read the oil dipstick is crucial for every rider.
Importance Of Regular Oil Checks
Regular oil checks help you identify issues early. They can extend the life of your engine. Clean oil ensures all parts move smoothly. It prevents overheating and wear.
Oil checks also help in maintaining fuel efficiency. They ensure that your bike runs at its best. Ignoring oil checks can lead to costly repairs. Regular maintenance keeps your Harley reliable and safe.
Tools You’ll Need
Checking your oil is simple with the right tools. Here’s a list of what you need:
- Oil Dipstick
- Clean Rag
- Oil Pan
- Funnel
- Fresh Oil (if needed)
| Tool | Purpose |
|---|---|
| Oil Dipstick | Measure oil level |
| Clean Rag | Wipe dipstick clean |
| Oil Pan | Collect old oil |
| Funnel | Pour oil without spills |
| Fresh Oil | Refill as needed |
With these tools, you can easily maintain your Harley Davidson. Keep them handy for regular checks.
Locating The Oil Dipstick On Your Harley
Knowing where the oil dipstick is on your Harley Davidson is crucial. It helps you check the oil level and ensure your bike runs smoothly. This guide will help you locate the oil dipstick easily.
Identifying Your Bike’s Model
First, identify your Harley Davidson model. Different models have the dipstick in different places. Check the user manual for your bike’s model name and number.
| Model | Location of Dipstick |
|---|---|
| Sportster | Near the transmission |
| Softail | Below the seat |
| Touring | Near the engine |
Accessing The Dipstick
Once you know your model, locating the dipstick is easier. For Sportster models, the dipstick is near the transmission. For Softail models, look below the seat. For Touring models, find it near the engine.
- Park your bike on a level surface.
- Turn off the engine and let it cool.
- Locate the dipstick based on your model.
Now you can access the dipstick. Pull it out, wipe it clean, and reinsert it. Pull it out again to check the oil level.
Preparing Your Motorcycle For An Accurate Reading
Getting an accurate reading of your Harley Davidson oil dipstick is crucial. Proper preparation ensures a correct oil level check.
Ideal Conditions For Checking Oil
For the best results, check the oil under specific conditions. Ensure your motorcycle is on a level surface. This prevents inaccurate readings due to tilting.
Make sure the engine is cool. A hot engine can give false readings. Aim to check the oil in the morning or after the bike has been off for a while.
Warming Up The Engine
Start your engine and let it run for a few minutes. This helps the oil circulate properly.
Once warmed up, turn off the engine. Let it sit for a minute. This allows the oil to settle.
After the engine has cooled, proceed with checking the oil. Use the dipstick as instructed in your manual.
Reading The Oil Dipstick: Step-by-step
Maintaining your Harley Davidson requires regular checks, especially the oil level. Reading the oil dipstick correctly ensures your bike runs smoothly. Follow this simple step-by-step guide.
Removing The Dipstick
- Ensure your bike is on a level surface.
- Turn off the engine and let it cool.
- Locate the oil dipstick near the engine.
- Twist the dipstick counterclockwise to remove it.
- Wipe the dipstick clean with a cloth.
Interpreting The Oil Level
- Reinsert the dipstick fully into the tube.
- Remove the dipstick again and check the oil level.
- Look for oil marks between the “Full” and “Add” lines.
- If the oil is below the “Add” line, add more oil.
- Ensure the oil level is between the lines for optimal performance.
Remember, a clean dipstick gives an accurate reading. Always use the recommended oil type for your Harley Davidson.
Understanding Oil Level Indicators
Knowing how to read your Harley Davidson oil dipstick is crucial. The oil level indicators help ensure your bike runs smoothly. Monitoring the oil level can prevent engine damage. This guide will help you understand these indicators.
The Significance Of High And Low Marks
The dipstick has two marks: high and low. The high mark shows the maximum oil level. The low mark shows the minimum oil level. Oil levels between these marks are ideal. If the oil level is above the high mark, it can cause leaks. If below the low mark, the engine might overheat.
What To Do If Oil Is Below Minimum
Check the oil level regularly. If the oil is below the minimum mark, add oil immediately. Follow these steps to add oil:
- Park your bike on level ground.
- Turn off the engine and let it cool.
- Remove the dipstick and wipe it clean.
- Reinsert the dipstick and pull it out again.
- Check the oil level on the dipstick.
- If low, add the recommended oil type.
- Recheck the oil level after adding.
Maintaining the correct oil level is essential. It ensures your Harley Davidson performs optimally. Always use the recommended oil type and amount.
Credit: serviceinfo.harley-davidson.com
Tips For Adding Oil To Your Harley Davidson
Proper oil levels keep your Harley Davidson engine running smoothly. Following a few tips can make the process easy and effective. Here’s how to add oil correctly.
Choosing The Right Oil
Choosing the right oil is vital for your bike’s performance. Always refer to your Harley Davidson manual. Use the recommended oil type and grade. Look for oils that meet Harley Davidson standards. Synthetic oils often provide better performance and protection. Ensure you use fresh, clean oil for the best results.
Step-by-step Oil Addition
Follow these steps to add oil to your Harley Davidson:
- Park your bike on a level surface. This ensures accurate oil readings.
- Turn off the engine and let it cool. Hot engines can give false oil levels.
- Remove the oil filler cap. This is usually located near the engine.
- Insert a clean funnel into the oil filler hole. This prevents spillage.
- Slowly pour the recommended oil into the funnel. Avoid overfilling.
- Check the oil level using the dipstick. Ensure it reaches the “full” mark.
- Replace the oil filler cap securely. This prevents leaks.
- Start the engine and let it run for a few minutes. This circulates the new oil.
- Turn off the engine and recheck the oil level. Add more oil if necessary.
| Step | Action |
|---|---|
| 1 | Park the bike on a level surface. |
| 2 | Turn off the engine and let it cool. |
| 3 | Remove the oil filler cap. |
| 4 | Insert a clean funnel into the oil filler hole. |
| 5 | Slowly pour the recommended oil. |
| 6 | Check the oil level using the dipstick. |
| 7 | Replace the oil filler cap securely. |
| 8 | Start the engine and let it run. |
| 9 | Turn off the engine and recheck the oil level. |
Common Mistakes To Avoid
Reading the Harley Davidson oil dipstick seems simple, but common mistakes can lead to engine issues. Below, we highlight some frequent errors and how to avoid them.
Overfilling The Oil
Overfilling the oil can cause many problems. The engine might overheat, and oil could foam. This reduces the oil’s effectiveness. Follow these steps to avoid overfilling:
- Check the oil level when the engine is cold.
- Place the bike on a level surface.
- Remove the dipstick and wipe it clean.
- Reinsert the dipstick fully and then remove it again.
- Read the oil level between the marks on the dipstick.
If the oil level is above the maximum mark, drain some oil out. Never assume more oil is better.
Ignoring Oil Quality And Viscosity
Ignoring oil quality and viscosity can harm your engine. The wrong type of oil can lead to poor lubrication and engine wear. To ensure you use the right oil:
- Check the owner’s manual for recommended oil types.
- Use oil that matches the climate you ride in.
- Inspect the oil’s color and consistency regularly.
Replace oil that looks dirty or smells burnt. Using the right oil ensures your engine runs smoothly and lasts longer.
Maintenance Schedule: Keeping Your Harley In Top Shape
Maintaining your Harley Davidson ensures it runs smoothly for years. Regular checks and timely oil changes are crucial. Reading the oil dipstick is part of this process. Follow the maintenance schedule to keep your bike in top shape.
Recommended Oil Change Intervals
Changing the oil at proper intervals is vital. Harley Davidson recommends changing oil every 5,000 miles. This helps maintain engine performance. Use only Harley-approved oil for the best results.
| Mileage | Maintenance Task |
|---|---|
| 1,000 miles | Initial oil change |
| 5,000 miles | Oil change and filter replacement |
| 10,000 miles | Check brakes and tires |
Additional Maintenance Tips
- Check Tire Pressure: Proper tire pressure ensures better control.
- Inspect Brakes: Regularly check brake pads for wear.
- Clean Air Filter: Clean the air filter every 5,000 miles.
- Battery Maintenance: Keep the battery terminals clean.
By following these tips, your Harley will stay in prime condition. Regular maintenance helps prevent costly repairs. Always refer to the owner’s manual for specific guidelines.
Troubleshooting Oil-related Issues
Maintaining your Harley Davidson’s oil is crucial for its performance. Sometimes, oil-related issues can arise. Knowing how to troubleshoot these problems will help keep your bike running smoothly.
Dealing With Oil Leaks
Oil leaks can cause serious damage. Here’s how to handle them:
- Inspect the dipstick: Check for low oil levels.
- Check the oil filter: Ensure it’s properly installed.
- Look for visible leaks: Examine the engine and oil pan.
- Check gaskets and seals: Replace if worn out.
If you find any leaks, fix them immediately. This will prevent further damage.
Addressing Discoloration And Contamination
Discolored or contaminated oil can harm your engine. Here’s how to address this:
- Check oil color: Fresh oil is amber. Dark oil indicates contamination.
- Inspect for particles: Look for metal shavings or debris.
- Change the oil: Replace old or contaminated oil.
- Use quality oil: Always use oil recommended by Harley Davidson.
Regular oil checks can prevent contamination. This ensures a longer engine life.
Conclusion: Best Practices For Oil Maintenance
Maintaining the oil in your Harley Davidson is crucial. It ensures the longevity and performance of your motorcycle. Knowing how to read the oil dipstick correctly is just one part of this maintenance. Let’s dive into the best practices for keeping your bike’s oil in top condition.
Recap Of Key Takeaways
- Check Oil Levels Regularly: Always check oil levels before long rides.
- Use the Right Oil: Harley Davidson recommends specific oil types. Stick to these recommendations.
- Read the Dipstick Correctly: Ensure your bike is on level ground. Warm up the engine before checking.
- Look for Signs of Contamination: Check for any unusual color or texture in the oil.
- Follow the Maintenance Schedule: Refer to your bike’s manual for oil change intervals.
Encouraging Regular Check-ups
Regular oil check-ups are essential for your Harley’s health. They prevent engine wear and tear. Here are some tips to ensure you never miss an oil check:
- Set Reminders: Use your phone or a calendar to set reminders for oil checks.
- Keep a Log: Maintain a log of oil checks and changes. Note dates and observations.
- Learn to Identify Problems: Educate yourself about the signs of oil issues. Look out for leaks and unusual noises.
By following these practices, you ensure your Harley Davidson remains in peak condition. Regular oil maintenance is key to a smooth and enjoyable ride. Remember, the better you care for your bike, the longer it will serve you.

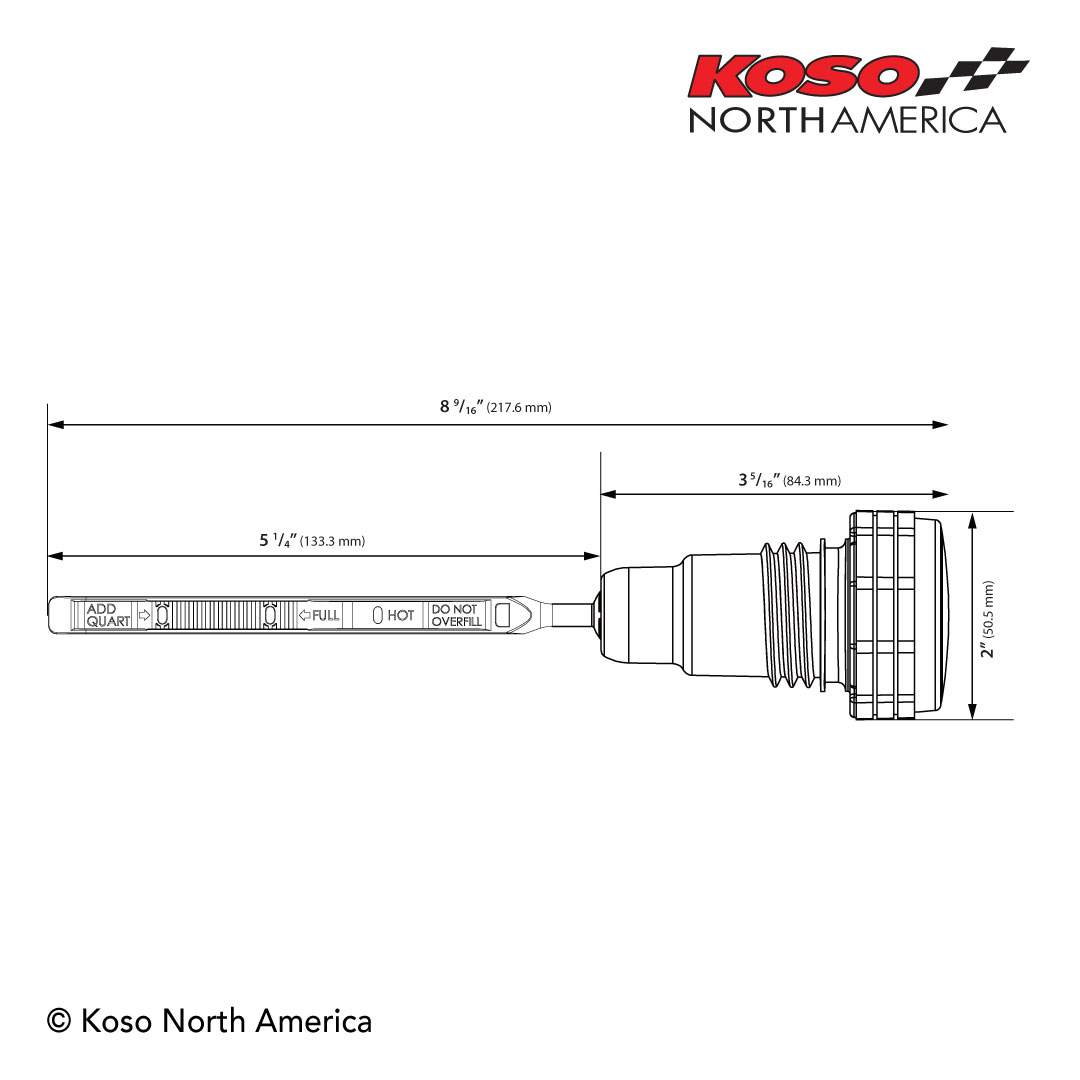
Credit: kosonorthamerica.com
Conclusion
Mastering the Harley Davidson oil dipstick is essential for bike maintenance. Regular checks ensure optimal engine performance. Follow these steps to keep your motorcycle running smoothly. Proper oil levels prevent engine damage and extend bike life. Always consult your owner’s manual for specific guidelines.
Enjoy your ride with confidence and peace of mind.