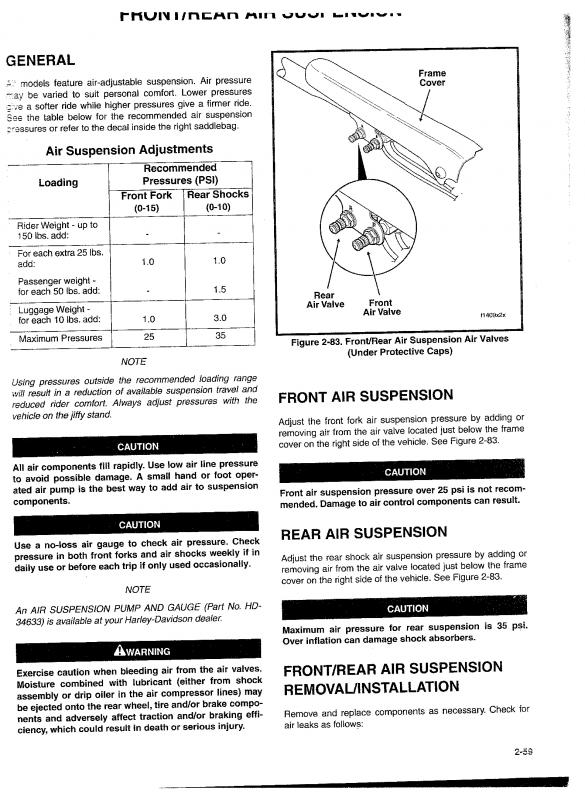
The Harley Davidson Air Suspension Chart provides detailed information on optimal air pressure settings. It ensures a smooth and comfortable ride.
Harley Davidson motorcycles are renowned for their comfort and performance. One key component that enhances rider experience is the air suspension system. The air suspension allows riders to adjust the bike’s height and firmness, catering to personal preferences and road conditions.
Using the Harley Davidson Air Suspension Chart, riders can find the recommended air pressure settings for various weights and riding styles. Properly adjusting the air suspension can significantly impact ride quality, stability, and overall comfort. This chart serves as a valuable tool for both novice and experienced riders aiming to optimize their motorcycle’s performance.

Credit: www.hdforums.com
History Of Harley Davidson Air Suspension
Harley Davidson has always been about comfort and performance. Air suspension plays a key role in this. This blog explores its history.
Origins Of Air Suspension
Air suspension started in the 1950s. It was first used in cars. This technology soon caught the attention of motorcycle makers.
Harley Davidson saw potential in air suspension. They began experimenting with it. The goal was to improve ride quality.
Early air suspension systems were simple. They used air pressure to support the bike. This provided a smoother ride.
Evolution In Harley Models
Harley Davidson gradually improved air suspension. They added it to more models. The Softail series was one of the first.
In the 1980s, Harley introduced adjustable air suspension. Riders could now change the suspension settings. This made the bikes more versatile.
Today, many Harley models feature advanced air suspension. These systems are highly adjustable. They offer a custom riding experience.
| Model | Year Introduced | Suspension Type |
|---|---|---|
| Softail | 1984 | Adjustable Air Suspension |
| Touring | 2009 | Advanced Air Suspension |
| Sportster | 2016 | Custom Air Suspension |
Harley Davidson air suspension continues to evolve. It remains a key feature. Riders can enjoy a comfortable and smooth ride.

Credit: www.cyclesolutions.com
Benefits Of Air Suspension For Motorcycles
Air suspension systems have transformed the riding experience for motorcycle enthusiasts. These systems offer various benefits that enhance comfort, safety, and performance. Below, we explore the key advantages of using air suspension on motorcycles.
Improved Ride Comfort
Air suspension provides a smoother ride by absorbing road imperfections. This technology adjusts to different road conditions, ensuring a comfortable journey. Riders experience less fatigue on long rides.
Traditional suspension systems can be harsh on bumpy roads. Air suspension, however, uses air-filled bags to cushion the ride. This system reduces vibrations and shocks, making the ride more enjoyable.
Adjustability For Different Loads
Air suspension allows easy adjustment for varying loads. Riders can change the air pressure in the suspension to match their needs. This feature is especially useful for touring bikes carrying luggage.
The adjustability ensures optimal performance under different conditions. Whether riding solo or with a passenger, the bike remains balanced. This adaptability enhances both safety and comfort.
Comparing Air Suspension And Traditional Suspension
| Feature | Air Suspension | Traditional Suspension |
|---|---|---|
| Ride Comfort | High | Medium |
| Adjustability | Easy | Limited |
| Load Handling | Excellent | Good |
Choosing air suspension offers significant advantages for motorcycle enthusiasts. The enhanced comfort and adjustability improve the overall riding experience.
Key Components Of Air Suspension Systems
Understanding the key components of air suspension systems is vital. Each part plays a role in ensuring a smooth ride. Let’s dive into the main parts of Harley Davidson’s air suspension.
Air Compressor
The air compressor is the heart of the air suspension system. It pumps air into the system, ensuring the air springs are properly inflated. Without it, the entire system would fail.
- Powerful and Efficient: Provides the necessary air pressure.
- Compact Size: Fits easily within the bike’s frame.
- Durable Build: Designed to last through tough conditions.
Air Springs
Air springs are the components that replace traditional coil springs. They provide a cushioned ride by adjusting the air pressure. This helps in absorbing shocks and bumps on the road.
- Adjustable: Allows for customizable ride height.
- Responsive: Quickly adapts to road conditions.
- Comfortable: Provides a smooth and cushioned ride.
Damping System
The damping system works with the air springs to control the ride quality. It helps in managing the rebound and compression of the suspension. This ensures stability and comfort.
- Precision Control: Offers fine-tuned suspension dynamics.
- Enhanced Stability: Keeps the bike steady on rough roads.
- Improved Comfort: Reduces vibrations and harshness.
| Component | Function | Benefit |
|---|---|---|
| Air Compressor | Pumps air into the system | Ensures proper air spring inflation |
| Air Springs | Replace traditional coil springs | Provide a cushioned ride |
| Damping System | Controls ride quality | Ensures stability and comfort |
Understanding The Air Suspension Chart
Harley Davidson motorcycles are known for their smooth rides. The air suspension chart helps riders adjust their bike settings for optimal comfort. Let’s dive into how to read and interpret this chart.
Reading The Chart
The air suspension chart provides vital information. It lists pressure levels and corresponding ride qualities. Each row shows different settings for various conditions.
| Pressure (PSI) | Ride Quality |
|---|---|
| 0-10 | Very Soft |
| 11-20 | Soft |
| 21-30 | Medium |
| 31-40 | Firm |
| 41-50 | Very Firm |
Interpreting Pressure And Ride Quality
Each pressure setting affects ride quality. Lower pressures (0-10 PSI) offer a very soft ride. This is ideal for smooth roads.
Mid-range pressures (11-30 PSI) provide a balance. These settings suit mixed road conditions. Higher pressures (31-50 PSI) ensure a firm ride. This is best for rough terrains or heavier loads.
- 0-10 PSI: Ideal for smooth city rides.
- 11-20 PSI: Good for daily commutes.
- 21-30 PSI: Best for mixed conditions.
- 31-40 PSI: Suitable for rough roads.
- 41-50 PSI: Perfect for heavy loads and rough terrains.
Adjusting the air suspension to the right pressure ensures a comfortable ride. Always refer to the chart for accurate settings.
Setting Up Your Harley’s Air Suspension
Setting up your Harley Davidson’s air suspension can feel complex. But it becomes easier with the right steps and tips. This guide will help you through the process. You’ll learn how to set up and fine-tune your air suspension for a smoother ride.
Initial Setup Steps
The initial setup is crucial for optimal performance. Follow these steps to get started:
- Check the Manual: Always start by reading your Harley’s manual.
- Gather Tools: You’ll need a wrench, air pump, and gauge.
- Lift the Bike: Use a jack to lift your Harley.
- Inspect Components: Ensure all parts are in good condition.
- Install Air Shocks: Follow the instructions for attaching the air shocks.
- Set Initial Pressure: Use the air pump to set the initial pressure. Refer to the chart for recommended settings.
Fine-tuning For Personal Preference
Fine-tuning your air suspension enhances your riding comfort. Here’s how to adjust it to your liking:
- Ride and Test: Take a short ride and feel the suspension.
- Adjust Pressure: Add or release air to find your sweet spot.
- Check Balance: Ensure both sides have equal pressure.
- Repeat: Ride and adjust until you are satisfied.
For quick reference, here’s a simple air suspension chart:
| Rider Weight | Front Pressure (psi) | Rear Pressure (psi) |
|---|---|---|
| 100-150 lbs | 10-20 | 20-30 |
| 151-200 lbs | 20-30 | 30-40 |
| 201-250 lbs | 30-40 | 40-50 |
| 251+ lbs | 40-50 | 50-60 |
Setting up your Harley’s air suspension properly ensures a smoother, more comfortable ride. Follow these steps and adjust according to your preferences.
Common Challenges And Troubleshooting
Harley Davidson air suspension systems add comfort and control to your ride. But they can face common challenges. Knowing how to troubleshoot helps keep your bike in top shape.
Leak Detection And Repair
Leaks are a common issue in air suspension systems. They can cause reduced performance. Here are steps to detect and fix leaks:
- Inspect the air lines and connections for visible damage.
- Use soapy water to check for leaks at joints and fittings. Bubbles indicate a leak.
- Replace any worn or damaged components immediately.
- Tighten loose connections to ensure a proper seal.
Regular inspection can prevent major issues. Catching leaks early keeps your system reliable.
Maintaining System Pressure
Consistent system pressure is key for optimal performance. Here are tips to maintain pressure:
- Check the air pressure regularly with a reliable gauge.
- Ensure the compressor is working correctly.
- Adjust the pressure according to the load and riding conditions.
- Listen for unusual noises, which may indicate a pressure issue.
Maintaining the right pressure ensures a smooth and safe ride. Keep an eye on the system to avoid sudden drops in pressure.
Regular maintenance and vigilant monitoring can prevent most common air suspension issues. Addressing problems early ensures your Harley Davidson performs at its best.
Performance Upgrades And Modifications
Enhancing your Harley Davidson’s performance with air suspension systems can transform your ride. Whether you’re seeking smoother rides or improved handling, air suspension offers versatility. This section provides valuable insights on performance upgrades and modifications for your Harley. Discover the benefits of aftermarket kits and customization tips to elevate your bike’s capabilities.
Aftermarket Kits
Aftermarket air suspension kits offer a range of benefits. They can improve ride quality and handling. Here’s a table showcasing popular kits:
| Kit Name | Features | Price Range |
|---|---|---|
| Legend Air Suspension | Adjustable ride height, easy installation | $1,200 – $1,500 |
| Arnott Ultimate Ride | Durable, smooth ride | $1,000 – $1,300 |
| Progressive Suspension | High performance, reliability | $900 – $1,200 |
Legend Air Suspension kits are known for their adjustable ride height. This allows you to customize the stance of your bike. Arnott Ultimate Ride kits are praised for their durability and smooth ride. Progressive Suspension offers high performance and reliability at a slightly lower cost.
Customization Tips
Customizing your air suspension setup can enhance your riding experience. Here are some tips:
- Select the right kit: Choose a kit that suits your riding style.
- Adjust ride height: Lower the height for better stability.
- Check compatibility: Ensure the kit fits your Harley model.
- Professional installation: Seek professional help for accurate setup.
- Regular maintenance: Keep the system in top condition.
When selecting a kit, consider your riding style. For aggressive riders, higher performance kits are ideal. Adjusting the ride height can provide better stability and control. Always check for compatibility with your specific Harley model. Professional installation ensures optimal performance and safety. Lastly, regular maintenance keeps your air suspension system functioning smoothly.
Maintenance And Long-term Care
Proper maintenance and long-term care of your Harley Davidson air suspension system is crucial. Regular upkeep ensures smooth rides and extends the life of your bike. This section covers essential practices for maintaining your air suspension system.
Routine Checks
Routine checks are vital for the health of your air suspension. Ensure you perform these checks frequently to avoid unexpected issues:
- Inspect the air pressure levels monthly.
- Check for any leaks or punctures in the system.
- Examine the hoses and connections for wear and tear.
- Ensure the compressor is functioning correctly.
Professional Servicing Recommendations
While routine checks are important, professional servicing ensures thorough maintenance. Here are some recommendations for professional servicing:
- Schedule a comprehensive check-up every six months.
- Have a professional test the system for leaks.
- Ensure all components are lubricated and in good condition.
- Replace any worn-out parts immediately.
Following these steps will help maintain the efficiency and longevity of your Harley Davidson air suspension system.
Credit: www.roadglide.org
Conclusion
Finding the right Harley Davidson air suspension is crucial. Our chart simplifies the process. Enhance your ride’s comfort and performance with the ideal setup. Always prioritize safety and consult professionals for adjustments. Happy riding!